Search This Blog

Featured Post

Simple Flower and Lace Headband Tutorial

This post may contain affiliate links, please check out my disclosures page for more info.  Thanks! As promised yesterday, here is my headb...

Showing posts with label headbands. Show all posts

Thursday, March 29, 2018

Simple Flower and Lace Headband Tutorial

This post may contain affiliate links, please check out my disclosures page for more info.  Thanks!

As promised yesterday, here is my headband tutorial.

Simple Flower and Lace Headband Tutorial

I will show you how to make this simple head band, accented with a pretty fake flower.

Materials needed to make a flower lace head band.  Wide lace, blank headband, ribbon, flower, glue gun, and scissors.

Materials needed:

  • Glue gun with glue.
  • Ribbon.
  • A large flower.
  • A lace rosette, check out my video tutorial if you don’t know how to make one.
  • Scissors.
  • A plain headband, I prefer metal ones because they can be adjusted to fit your head without breaking.
  • Any other embellishments you want.


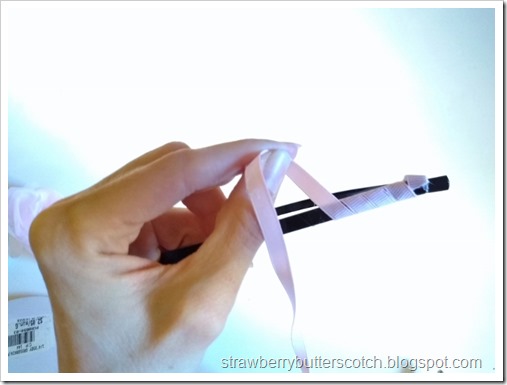
Making a flower and lace headband.  Wrap ribbon around the headband, glueing as you go.

First, glue the end of the ribbon to the end of the headband to start covering it.

Making a flower and lace headband.  Wrap ribbon around the headband, glueing as you go

Proceed to carefully wrap the ribbon around the head band, applying glue as you go.  Be careful not to burn yourself on the hot glue.

Making a flower and lace headband.  Wrap ribbon around the headband, glueing as you go.

When you get to the other end, cut the ribbon and glue down the end.

Making a flower and lace headband.  Wrap ribbon around the headband, and when finished you may wrap more ribbon on the ends for a polished look.

If you want,  you can wrap a little extra ribbon on the ends of the headband.  This will give it a more polished look, but I’m too lazy for that.

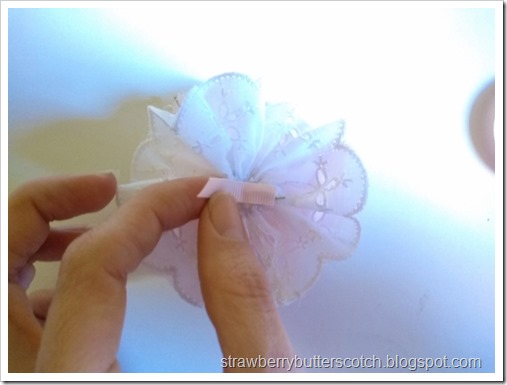
Making a flower and lace headband.  Add the flower to the lace rossette.

Now for the flowers.  If your flower has a wire stem like mine, you will want to stick it through the center of the rosette.

Making a flower and lace headband.  Add the flower to the lace rossette.

It looks kind of cute like this. :)

Making a flower and lace headband.  Add the flower to the lace rossette.

Then you twist down the wire, so it lies flat and add some glue to secure it.

If your flower doesn’t have wire, you can just glue it to the center of the rossette.

As an alternative to the large flower, you can use a cluster of three or more smaller flowers.  Use whatever you like.

Making a flower and lace headband.  Use some ribbon and glue to attach the flower piece to the headband.

Moving on, glue the end of the piece of ribbon over the center of the back of the flower and rossette piece.

Making a flower and lace headband.  Use some ribbon and glue to attach the flower piece to the headband

Wrap this ribbon around the headband…

Making a flower and lace headband.  Use some ribbon and glue to attach the flower piece to the headband

…Then glue down to attach the piece to your headband.  Make sure it is where you want it on the headband before you glue it.

Making a flower and lace headband.  Use some ribbon and glue to attach the flower piece to the headband

Now it is ready for more decorations.

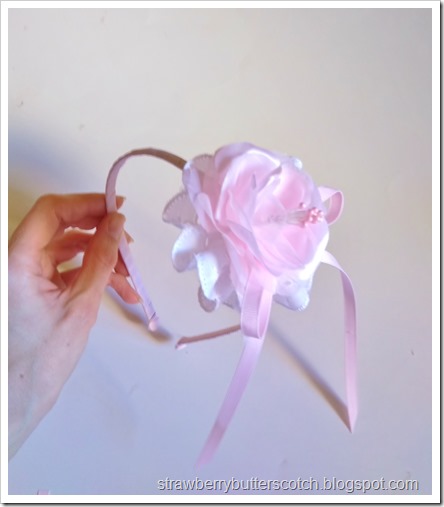
Making a flower and lace headband.  Add a ribbon bow and anyother embellishments you want, then you're done!

I added a ribbon bow with long tails (check out my simple bow video tutorial if needed), because I thought it looks pretty.  You can add jewels, strands of pearls, or anything else you want.

Enjoy the headbands and have a happy Easter.


Give it a try:

Read More »

Friday, September 29, 2017

Sewing for Baby: Another Pillowcase Dress and Headbands

I’m finally getting around to posting this!  The first project on my craft list is a baby craft.

I had another baby shower to attend, another one for a baby girl!  So I decided to make another pillowcase dress (see More Pink for Baby).

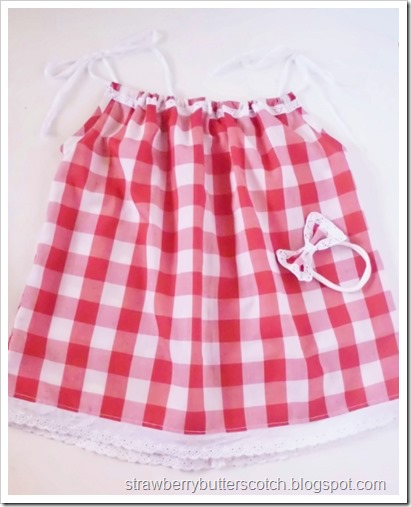
Red and white gingham print pillow case dress for baby, with matching headband.

This one I made with an adorable red and white gingham print I had in my fabric stash.

Red and white gingham print pillow case dress for baby.  Close up on the lace.

I used a soft lace instead of ribbon for the ties and added the same lace across the front.

Red and white gingham print pillow case dress for baby.  Close up on the lace.

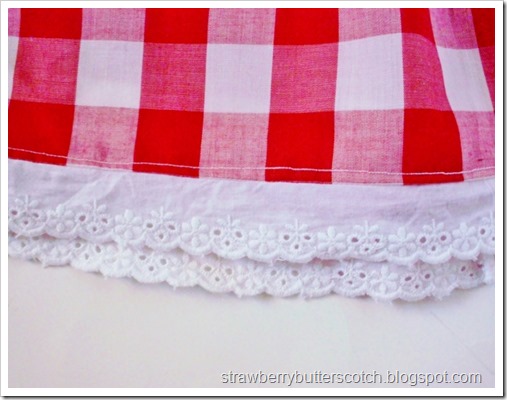
I used the same eyelet lace along the hem as with the previous dress.

Lacey gingham print bow headband for baby.

For this dress, I also made a matching bow headband.  It uses the same lace as the dress, and just like the head bands I made for the last baby shower (see More Pink for Baby), I used tights for the stretchy part.

Pretty lace and ribbon headbands for baby.

And because it’s hard to stop at just one headband, I made two more.  These are for a different baby I know.  She’s already born, but I missed her baby shower, so this is a late but cute gift for her.

Here’s the updated list:

  • Baby
  • Blue dress
  • Tiny outfits
  • T-shirts
  • Halloween
  • Pink dress
  • More T-shirts

One down, six more to go.  I will try to get the next one up a bit sooner.  Look forward to it!

Read More »

Thursday, April 20, 2017

Pink Lace for Easter

This post may contain affiliate links, please check out my disclosures page for more info.  Thanks!

Well, a few days after Easter and I’m finally getting around to posting this. 

It’s my Easter dress!

Pink all over lace dress for Easter.

I used that over all lace fabric I bought as SAS (see A Quick and Pink Craft Haul).  I wanted something pink and floral this year and while thinking about that I got the idea to use lace.

Ribbon roses on neckline of an Easter dress.

I made little roses from ribbon to decorate the neckline.  It took a while because not only did I have to make each one by hand, but I also had to re-learn how to do it.  It’s been a while since I last made them. 

Funny thing is that the last time I made ribbon roses was also for an Easter dress (see Time for Some Catching Up).  Actually a lot of the design for this dress was inspired by that dress.

I added little faux pearl beads to the center of each rose for an added touch.

Ribbon at the waist on a pretty pink dress.

I used a wide ribbon the same color as the roses as a sash around the waist.

Short sleeves on a pretty pink dress.

The “sleeves” are made solely from the lace, so they have a sheer appearance.  I originally wanted to make a section on the front of the bodice with just the lace, but I thought that might be a tad too revealing.  Not to mention too complicated and time consuming to complete in such a short time frame.

Ribbon and lace on a pink dress.

Instead of hemming the edge of the lace of the skirt, I added ribbon to finish it.  It helps to balance out the top.  It wasn’t exactly the easiest thing I’ve ever sewn.  Those who sew lace and netting a lot would understand.  And I think I would recommend using clips instead of sewing pins.  The pins mostly got in my way and snag the ribbon.

Now for the accessories, because why make a pretty dress without completing the outfit?

Beautiful flower head band for Easter.

I made a pretty headband using the pink and white flowers I bought from SAS.  I actually had to make it twice.  The first time it looked pretty, but I realized it didn’t look as pretty on my head which is necessary for a “head” band.  So I took it apart and put it back together again.

Simple and pretty pearl necklace.

I also made a necklace of faux glass pearls to help tie in the headband and stuff.  I bought these pearls ages ago at Joann.  Makes for a simple yet pretty necklace that I can wear with just about anything, super plus.

Pretty pink purse to match a pretty dress.

Since I bought a ton of fabric, I whipped up a matching purse too.  It’s simple little bag with a flap, similar to several I’ve done before.  The flap closes with Velcro.  I normally use snaps, but I was lazy this time.  It’s so much faster to use Velcro, at least when you use a sewing machine.  I made a larger ribbon rose to finish the bag.

Ribbon rose shoe clips to match a pink Easter dress.

Speaking of larger ribbon roses, I made a pair of them to make the final accessory, shoe clips.  Because my cute white shoes needed a little something to tie them in with the rest of the outfit.  I made them just like the shoe clips I made last year (see Lace Rosette Shoe Clips with a Twist and Tutorial).  A simple and cute way to finish off a pretty pink outfit.

Here’s the updated list:

  • Dress
  • Accessories
  • Jeans
  • Baby
  • Little dress

Two down, three more to go.  I’m running late with the next two, but I should have them up soon.  Look forward to it.

Read More »

Monday, March 20, 2017

Tiny Blue Lace Dress for A Doll, and a Tutorial?

It has been a while since I made anything for my ball jointed dolls, and one particular doll has been waiting a long time for something to wear.

Cute blue dress with lace for a ball jointed doll.

This is Yuna, a 1/6 scale ball jointed doll that I got last November.  Until now the only thing I had made for her to wear was a sweater (see From Socks to Doll Sweaters) to pair with a borrowed dress from one of the other dolls.

But now she has this adorable little blue doll dress to wear.  It is made from a scrap of blue cotton left over from a Halloween costume (see Halloween = Tulle) with a little bit of lace. 

Cute blue dress with lace for a ball jointed doll.

I decorated it with tiny pearl beads and a tiny rosette and ribbon bow.

And for those who have ball jointed dolls this size or similar sized dolls, I have a little treat.  I made a sewing tutorial for this dress on my doll blog.  It includes a free downloadable pattern.  Feel free to check it out.

Blue doll dress with a lace headband and a bag.

In addition to the dress, I whipped up a simple little felt bag and a cute lace headband.  The bag is made the same way as the felt doll purses I made last summer (see 5 a Week: Cute Felt Bags for Dolls with a Tutorial).

Pretty lace head band for a doll.

The headband is just some lace with a bit of elastic at the back.  Super easy to whip up and super pretty.  I think I want to make some more, for me and my dolls.

Cute blue dress with lace for a ball jointed doll.

Overall, it makes for one cute little dolly outfit.  And there are more to come later.

Here’s the updated list:

Four down, just one more to go.

Read More »

Friday, October 28, 2016

Doll Head Bands with a Tutorial

This post may contain affiliate links, please check out my disclosures page for more info.  Thanks!

It may have took forever, but I finally finished a project on my craft list.  Just a little something I whipped up for my dolls.

Headbands for dolls made of pearls, ribbon, lace and jewelry wire.

Doll sized head bands!

I made several little bitty head bands for my ball jointed dolls (check the doll blog to see their reaction).  It’s been something I’ve been dying to try but couldn’t for one silly reason.  I couldn’t find doll-sized blank head bands to cover. 

Then I realized I could use something else as the base, jewelry wire.  It’s easy to find and works great, as you will see.

Pretty pearl head band for a doll.

This first head band is made of faux pearls strung on to the wire.  I have a similar head band which is how I got the idea.

Pretty lace doll-sized headband.

The next one is made of lace wrapped around the wire.  I added a little bitty lace rosette to decorate.  It probably would look cute with a tiny flower or button in the center of the rosette, but for now this will do.

Cute ribbon bow headband for a doll.

For my smaller ball jointed doll, Sakura, I made these sweet ribbon head bands.

Cute pink bow head band for a doll.

I just wrapped the wire with ribbon and added a simple bow.

Pink ribbon headband for a doll.

For this doll, Usagi, it’s the same thing but with a slightly less simple bow.

Cute lace headband for a doll.

And this headband is wrapped with both lace and ribbon.  The lace is over the pink ribbon, so you can see a hint of pink color through the lace.  Looks cute enough to try on a human sized head band.

Since these head bands were so cute and easy to make, I made a video tutorial.

All you need are:

And of course a doll.

Wait, there’s more.  In honor of Halloween I made a few more doll sized head bands.

Cat ears for dolls, perfect for Halloween.

I made cat ear head bands!

Cat ear headbands for dolls, perfect for Halloween

They are easily made of felt and jewelry wire.  Don’t they look adorable on the dolls.

And I also made a second video tutorial for these, so everyone’s dolls can dress up for Halloween.

Enjoy!

Here’s the updated list:

  • Pink dress
  • Accessories
  • Socks
  • Headbands
  • T-shirts
  • Tank Top

One down, five more to go.  The next one will be up soon.  Look forward to it!

Read More »

Sunday, October 2, 2016

Velvet and Lace, Making a Black Dress Cuter

The previous couple of projects for my craft list were skirts, but this one is a simple dress.

Making a simple velvet dress cuter with lace and pearls.

I found this velvet dress (like much of my wardrobe) at a thrift store and had to have it.  I have several black velvet dresses and pretty much wear them year round.

This particular one didn’t fit me as well as I would have liked, a frequent problem for me.  I could have easily just taken it in a little and left it at that, but why not do a little more?

Taking the dress in.

I first pinned it on the sides and at the top.  This obviously makes the dress smaller and the top part of it shorter, my unusual problem areas for fitting.

Making a simple velvet dress cuter with lace and pearls.

After sewing and trimming off the excess, just needed to embellish the dress a little.  I added this pretty lace along the neckline along with some pearls to make it extra special.  Looks really nice and it hides any sewing errors.

Making a simple velvet dress cuter with lace and pearls.

The results: A super pretty velvet dress that actually fits me.

A black velvet headband made with fabric scraps.

As an extra bonus, I use the scraps of fabric to make a matching headband.  I just wrapped the strips of fabric around the blank headband base while gluing it down, and then added a simple bow.  A great way to complete this pretty new outfit.

Here’s the updated list:

Four down, just two more to go.  The next one should be up by Friday.  Look forward to it!

Read More »

Sunday, August 16, 2015

5 a Week: Chocolate and Cream

It’s Sunday, so it’s time for week 7 of…
 

…The Five a Week Pledge.
 
If you haven’t been around here, it’s where you pledge to do five things each week of your choice (see the first week for more info).  I pledged to make five small crafts each week.  Feel free to grab a button and join me.  If you already have, post a comment or a link to share what you accomplished.
 
This week’s craft:

Cream lace and chocolate ribbon accessories

Chocolate and Cream.

That is, accessories made with more chocolate brown ribbon and creamy off-white lace.  I got the idea from some of the lace cuffs from last week’s craft.  From the left is a pair of choker necklaces, then a headband on top, a hair clip below it, and a small broach.

The chokers were made by cutting a length of the lace about long enough to wrap around my neck plus a little extra for hemming and breathing room, super important.  I cut a second piece of lace and sewed the two together along their top edges.  The chocolate ribbon covers this seam.  All I had to do then was hem the ends, add some snaps and make and attach a bow.  Then repeat all to make a second one.

For the headband, I did the same thing with the lace as the chokers.  It’s actually two layers of lace pieces sewn together with two rows of stitches down the center.  This created a channel that I could slide a plain metal headband through.  Then I added the ribbon.  I also wrapped ribbon around the ends of the head band to hide the raw edges of lace and to make it cuter and more comfortable.  A couple more bows and it was done.

The hair clip and the broach was made pretty much just like the lace applique broaches I made several weeks ago.  Here’s the tutorial if you missed it.  Again all it took to finish them was a few chocolate ribbon bows.

On another note, I’m going on a short hiatus from blogging here.  Just for the week, I’ll be back in time for the blog hop this Saturday.  I just wanted to mention it so no one thinks I’ve “gone quiet” again.  It’s just for the week and not several months.  I’ll be working on a few projects, including ones for this blog.  Look forward to it.

Read More »

Thursday, June 25, 2015

Catching Up – Conventions Anyone?

Last month I went on my usual yearly pilgrimage to that most sacred haven for those of us who are truly passionate about our hobbies and interests.
Phoenix Comicon 2015 program guide cover
Phoenix Comicon.
This was my third year attending, and probably the best yet.  Of course this was mostly due to proper planning.  There were plenty of things to do to make this year successful. Some of the things that helped:
  • Bringing food and water – My friends and I packed bentos the night before, both so we wouldn’t have to pay outrageous prices for the food there and because it was just more fun.
  • A Parasol – This is a must for me. Since this event is always in the summer in Arizona to boot, and since there are some events that are outside, it helps to have portable shade such as an umbrella or parasol.  Plus a parasol matches my outfit well.
  • A fan – Because sometimes having shade isn’t enough. It helps to have a portable breeze too.  I found a pretty floral print fan at SAS for about $2 for this purpose.  Works great and still matches my outfit.
  • A cute tote bag – Even if you go in traveling light, you probably won’t leave that way especially if you stop by the vendors hall.  I had a cute Hello Kitty foldable shopping bag for this.
  • Pen and notebook – It does help to have something to write with or on. Good for jotting down info from a panel or writing notes in the guidebook about what you want to do.  Even getting contact info from new friends.
  • A sweater – The paradox of Arizona summers, blistering heat outside, frigid air conditioning inside.  I kept a pink cardigan in my bag just in case, and I did use well.
  • A sewing kit – This came in handy the night before, you’ll see why.
  • The Padawan Room – This is something I found in the guide. A special room setup for families with small children to relax. My friends brought their adorable now 6 month old baby boy this year, so this room was indispensible for us.
And of course what really helped was extra planning on outfits.  For starters…
Superhero dress and matching tote bag
…dealing with this one.  My friend asked me to make her this dress to wear.  It’s made with a cute print featuring Super Girl, Bat Girl, and Wonder Woman. Perfect for Comicon.  It ties at the straps both to make it cute and to make it easier for my friend to feed her son.  And of course it has pockets, she loves those.  The problem came when she tried it on the night before.  It somehow ended up a little too big for her.  That’s why dress rehearsals are necessary.  I had plenty of time to take it in for her. In addition to the dress, I made a matching tote bag and…
Superhero accessories
…accessories! Hair clips and wrist bands.  The wrist bands help with the super hero theme. 
A-line teal blue dress with ribbons
Now here’s what I wore.  It has an A-line skirt made from a pattern I drafted myself and the bodice came from a pattern for a top I really liked. 
Dress neckline closeup
It has lace running down the front seams and across the neckline as well as along the scalloped hem.  The look is complete with a wide ribbon sash as the waistline and match ribbon bows.  It was super difficult to decide on a color for the ribbon, especially with the strange color of the fabric.
close up of scallop hem
Funny thing about the dress, it’s known as my “Spring Dress”.  I had originally planned to make it as my Easter dress, but didn’t finish it in time.  I was literally working on it the night before Easter Sunday.  I decided then to just wear something else, since staying up all night to finish was possible but sleep was more important.  I eventually finished it and that’s all that matters.
Ribbon rose and lace headband
Of course I had to make some accessories to match.  Here’s the pretty head band made with the rest of the ribbon as well as some eyelet lace and a couple of faux pearls.  I had some trouble because I couldn’t remember how to make ribbon roses.  I managed to figure it out, after much trial and error.  The pearls were a bit of an after thought, but ended up being absolutely essential.
Comicon Selfie
Here’s a worn shot taken in a hotel restroom, classy I know.  You can see that I also made a couple of faux pearl bracelets and a necklace to complete the look.  I layered the necklace with my cameo necklace for a shall we say dressier look.  I actually also added a vintage pearl broach to my headband for the same reason.  Lots of pearls that day.  I was wearing a pair of simple lace gloves too.  I got them at SAS a few months ago and have worn them several times.  All that wear caught up with them and one of the fingers busted on me, which is why I’m just wearing the bracelets in the photo.  It pays to have extra accessories on hand.  It came in handy while getting dressed that morning too.  I had packed a lot more accessories and extra shoes and socks just in case my first choices didn’t work.
Dark Horse Comics promotional materials
Enough about clothes, time for some goodies.  There were tons of stuff to see at the vendors hall.  Of course I didn’t leave empty handed.  From Dark Horse Comics I got a free comic from Free Comic Book Day, a cute poster, a mini-pin and some information about their scheduled events.  Super practical.
Christopher Lee pin and card
There was this artist who made these cute mini-pins he was actually giving away for free while selling his prints.  I actually had to ask because I found it so surprising.  Anyway, his pieces are really cool and some of them are so cute.  You can check them out at his website at www.thebeastisback.com.
lace choker gift
One the biggest surprises, while I was wandering by myself I found this booth that had cute baby and kids t-shirts that I knew my friends would love for their son.  I let them know where it was, and while I was waiting for them a woman from the booth just gave me this necklace.  She commented on my outfit and said this would probably match something I own.  It’s true, with a little altering this would look perfect with several of my dresses.  Of course I thanked her and my friends showed up and bought several of the cute t-shirts.  Sadly I couldn’t get a business card or anything from them.  Pity.
Orange grab bag
Now for stuff I actually bought.  I have a thing for grab bags.  The mystery of what could possibly be inside, at bargain prices no less, plus the surprise when you open it.  It has definite appeal.  Of course they can be hit or miss.  This first one was mostly and miss for me.  Everything in it was orange, orange is probably my least favorite color.  There’s a pair of fake glasses, an interesting crown head band, a panda hat and a duck shaped silicon change purse.  That last one is actually pretty cute. The rest I can either sell or give away as gifts/prizes.  Hmm, do I smell a giveaway?
MLP grab bag
The second grab bag was a definite hit, it was also the least expensive one so a real plus.  It was wrapped in Christmas wrapping paper and said it was for girls.  Inside was a MLP mini-tote bag, a keychain from an anime series I don’t quite recognized, a MLP pin that is probably fan made, and a tube of Lip Smackers lip balm.  Super cute!
Overall this was a super fun con, and I can not wait until next year.
Read More »

Popular Posts