Search This Blog

Featured Post

Simple Flower and Lace Headband Tutorial

This post may contain affiliate links, please check out my disclosures page for more info.  Thanks! As promised yesterday, here is my headb...

Showing posts with label holidays. Show all posts

Wednesday, October 31, 2018

Sewing for Dolls: Some Last Minute Halloween Costumes

This post contains affiliate links, please check out my disclosures page for more info.  Thanks!

I cut it really close for this next craft project, but at least they are finished.  Just in time for Halloween.

Four little dolls dress up for Halloween in homemade costumes complete with cute pumpkin buckets.

Doll sized Halloween costumes.

I got my 1/6 scale ball jointed dolls all ready for Halloween.  Or should I say they got themselves ready?  Check out the doll blog to see, also to learn how to make some of these costumes for your own dolls at home. 

Doll halloween costumes 02 (465x640)

For this one (Yuna), it’s a super easy ghost costume.  Just need to cut some sheer gauzy fabric and slip it on.

My sister thought I should do it like on the Charlie Brown Halloween special, maybe next year.

Doll halloween costumes 03 (640x592)

This little boy is just wearing the cat eared headband I made previously.  Check out my doll headband video tutorial to make one, it works for dolls of all sizes.

Doll halloween costumes 04 (640x527)

For the next costume, you can see here how the doll (Sakura) “made it herself”.

Doll halloween costumes 05 (476x640)

It started as a simple robe, that could work for a wizard.  Don’t forget to check out my doll blog to see how to make it.

Doll halloween costumes 06 (342x640)

But, flip it around and throw on a hat, and it’s a classic witch costume.

Doll halloween costumes 08 (483x640)

The next costume (for Momoko) started as a doll swimsuit with a tutu, instant ballerina.

Doll halloween costumes 07 (640x383)

The tutu is made from a long piece of tulle folded in half with some elastic. 

Doll halloween costumes 09 (640x620)

But, take one of these butterflies from Dollartree and glue on a clip…

Doll halloween costumes 010 (579x640)

…Then clip it on my doll’s clothes for wings…

Doll halloween costumes 011 (468x640)

…And now it’s a fairy costume.

All the dolls dressed and ready for trick or treating, but one more thing.

Doll halloween costumes 013 (640x612)

These little buckets.  I was lucky enough to find them at Goodwill, but they actually sell them at Party City.

You can find the pumpkin buckets here and the Cauldrons here.

Doll halloween costumes 014 (491x640)

They are just the right size for my dolls, and add just the right touch to my doll sized Halloween.

Here’s the updated list:

  • Costume
  • Case
  • Doll and Kitty
  • Little Halloween
  • 3 Skirts
  • Accessories
  • Socks
  • Overalls
  • Ornaments
  • More Cases

Two down, eight more to go.  Happy Halloween everybody.


Give it a try:

Read More »

Thursday, March 29, 2018

Simple Flower and Lace Headband Tutorial

This post may contain affiliate links, please check out my disclosures page for more info.  Thanks!

As promised yesterday, here is my headband tutorial.

Simple Flower and Lace Headband Tutorial

I will show you how to make this simple head band, accented with a pretty fake flower.

Materials needed to make a flower lace head band.  Wide lace, blank headband, ribbon, flower, glue gun, and scissors.

Materials needed:

  • Glue gun with glue.
  • Ribbon.
  • A large flower.
  • A lace rosette, check out my video tutorial if you don’t know how to make one.
  • Scissors.
  • A plain headband, I prefer metal ones because they can be adjusted to fit your head without breaking.
  • Any other embellishments you want.


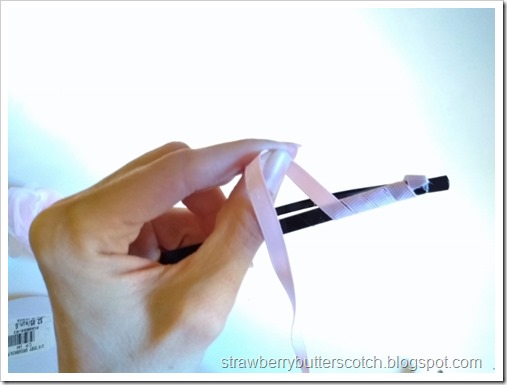
Making a flower and lace headband.  Wrap ribbon around the headband, glueing as you go.

First, glue the end of the ribbon to the end of the headband to start covering it.

Making a flower and lace headband.  Wrap ribbon around the headband, glueing as you go

Proceed to carefully wrap the ribbon around the head band, applying glue as you go.  Be careful not to burn yourself on the hot glue.

Making a flower and lace headband.  Wrap ribbon around the headband, glueing as you go.

When you get to the other end, cut the ribbon and glue down the end.

Making a flower and lace headband.  Wrap ribbon around the headband, and when finished you may wrap more ribbon on the ends for a polished look.

If you want,  you can wrap a little extra ribbon on the ends of the headband.  This will give it a more polished look, but I’m too lazy for that.

Making a flower and lace headband.  Add the flower to the lace rossette.

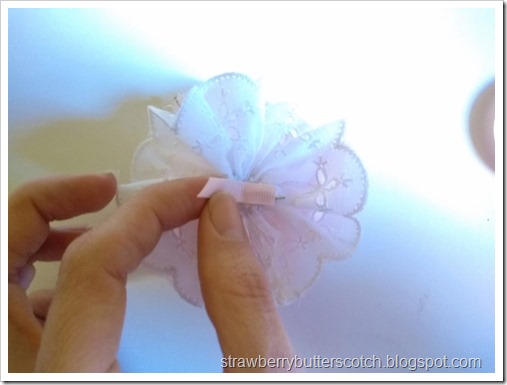
Now for the flowers.  If your flower has a wire stem like mine, you will want to stick it through the center of the rosette.

Making a flower and lace headband.  Add the flower to the lace rossette.

It looks kind of cute like this. :)

Making a flower and lace headband.  Add the flower to the lace rossette.

Then you twist down the wire, so it lies flat and add some glue to secure it.

If your flower doesn’t have wire, you can just glue it to the center of the rossette.

As an alternative to the large flower, you can use a cluster of three or more smaller flowers.  Use whatever you like.

Making a flower and lace headband.  Use some ribbon and glue to attach the flower piece to the headband.

Moving on, glue the end of the piece of ribbon over the center of the back of the flower and rossette piece.

Making a flower and lace headband.  Use some ribbon and glue to attach the flower piece to the headband

Wrap this ribbon around the headband…

Making a flower and lace headband.  Use some ribbon and glue to attach the flower piece to the headband

…Then glue down to attach the piece to your headband.  Make sure it is where you want it on the headband before you glue it.

Making a flower and lace headband.  Use some ribbon and glue to attach the flower piece to the headband

Now it is ready for more decorations.

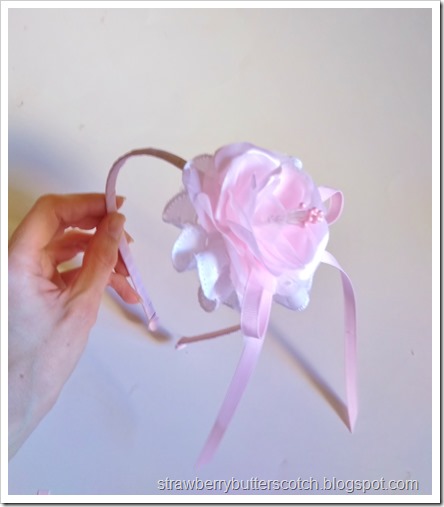
Making a flower and lace headband.  Add a ribbon bow and anyother embellishments you want, then you're done!

I added a ribbon bow with long tails (check out my simple bow video tutorial if needed), because I thought it looks pretty.  You can add jewels, strands of pearls, or anything else you want.

Enjoy the headbands and have a happy Easter.


Give it a try:

Read More »

Wednesday, March 28, 2018

Clothing Makeover: Altering a Pink Bodyline Dress for Easter

Normally, around Easter I work myself haggard trying to design and sew a lovely, ruffly new dress to wear on Easter Sunday.

This year, I decided instead to work myself haggard trying to alter a dress that needed work.

The before photo for the slightly ugly pink Bodyline dress

Here is the old dress that badly needed a makeover.  I got it in a lucky pack I bought from Bodyline.  The price was really cheap, but I’m not sure how “lucky” I was with this one.

The before photo for the slightly ugly pink Bodyline dress.  Close up of the collar with discoloration.

You can see here that the collar had odd stains on it, but that’s okay because I immediately thought it had to go anyway.  The lace looked kind of cheap and the collar overall was unflattering.

In addition to the collar, the elastic on the one of the sleeves was shot, the lace on the sleeves was horrible, the hearts down the front of the dress were overkill, and surprisingly I thought it could stand to have a little less lace and ruffles.

So after some time with a seam ripper and sewing machine…

The after photo of the madeover and improved pink dress, so much cuter now.

…Here’s the new dress.

Close up of the new neckline.

I chopped off that horrible collar and added a touch of lace to the new neckline.  You can see that it’s the lace from one of the hearts on the bodice.  It helps to tie in the whole dress.

Close up of the new dress bodice and neckline.

Obviously, I removed two of the hearts from the front of the bodice.  One is plenty, plus I can probably make something cute with the other two later.  I also removed two of the vertical strands of lace.

Close up of the new dress hemline with underskirt ruffle.

I removed one of the bottom ruffles, then realized the skirt was too short without it.  Oops. 

So I made a white underskirt to replace it.  It’s better this way, and I can wear the underskirt separately.

Close up of the puffed sleeves with new lace.

And finally, I replaced the elastic on the sleeves and switched the bad lace with the lace I ripped off the bodice.  The sleeves look much cuter now.

The new matching flower headband.

And just for fun, I whipped up a cute flower headband to go along with my new dress.  I think flower accessories are perfect for Easter, which is why I'm going to make a tutorial for the headband.

Here’s the updated list:

  • Dress makeover
  • Doll undies
  • Cameo and Hearts
  • Blouse makeover
  • Phone case
  • Outfit
  • Mother’s Day
  • Costume fix
  • Jammies
  • Bonnet

One down, nine more to go.  The next project should be up in a few more days, but the head band tutorial will be up tomorrow!  Look forward to it.

Read More »

Thursday, December 21, 2017

Sewing Pouches, Lots of Them

This post may contain affiliate links, please check out my disclosures page for more info.  Thanks!

The next craft project on my Christmas list involved a lot of sewing.

Sewing lots of differnt pouches using leftover fabric.  Great for easy diy gifts.

I made pouches.  Lots of different pouches.  They make great Christmas presents, especially if you fill them with little goodies like I’m going to do. :)

One of the great things about pouches is how versatile they are.  All of these ones were made basically the same way, a few tweaks to the design makes a huge difference.

Sewing lots of differnt pouches using leftover fabric.  Great for easy diy gifts.

The two on the left here were made from the kitty cat fabric I bought recently (see A Late Black Friday Craft Haul).  Now they work as a fun purse and a small clutch. 

The pouch on the right is made from leftover fabric from a baby project three years ago (see Sewing for Baby).  That’s the nice thing about pouches, they help use up your leftovers.

Sewing lots of differnt pouches using leftover fabric.  Great for easy diy gifts.

For some of them I curved some or all of the edges.  It adds a nice touch, especially to smaller bags.

Sewing lots of differnt pouches using leftover fabric.  Great for easy diy gifts.

I could have used buttons, loops, snaps, etc. to close them, too many options.  I chose soft Velcro because it was easy and I always have it on hand.

Sewing lots of differnt pouches using leftover fabric.  Great for easy diy gifts.

Pouches are also nice because you can make them for just about anyone, including guys.  These plaid ones are nice, but not as girly looking as they could be.

Sewing lots of differnt pouches using leftover fabric.  Great for easy diy gifts.

I added small straps to the back because sometimes it’s nice to have a strap to hold on to, but something longer would make it look too much like a purse.

Sewing lots of differnt pouches using leftover fabric.  Great for easy diy gifts.

The last two I made using more leftover fabric from a skirt I made sometime ago (see Just in Time for Christmas?).  The size and long straps make them look like pretty messenger bags.

That’s all I made, this time.  They’re fun to make and handy to have, so I will probably make more pouches in the future.

If you want to make some of your own, this envelope purse tutorial is very similar to my pouches.

Here’s the updated list:

Three down, just one more to go, and just four days until Christmas.  Getting so close, wish me luck!

Read More »

Tuesday, December 19, 2017

Christmas Crafts: Snowman Ornament with Tutorial

This post may contain affiliate links, please check out my disclosures page for more info.  Thanks!


The next craft project on my Christmas list is ornaments, snowman ornaments. :)

Cute snowman Christmas tree ornaments made from yarn and felt.  Plus a video tutorial. Learn how to make this Christmas craft.

I made cute little snowman ornaments using the sparkly yarn I bought from Joann (see A Late Black Friday Craft Haul).  And not just this one…


Cute snowman Christmas tree ornaments made from yarn and felt.  Plus a video tutorial. Learn how to make this Christmas craft.

…But several of them, fifteen in total.


Many of you already know that every year for Christmas I make ornaments to give to others.  I’ve been doing it for several years now.

For these ornaments, I was inspired by some snowball ornaments I made years ago.  I thought “why not snowmen?”


Cute snowman Christmas tree ornaments made from yarn and felt.  Plus a video tutorial. Learn how to make this Christmas craft.

The best part about them is how much fun it is to decorate them.  You can make them in so many different ways.  Some I made earmuffs for…


Cute snowman Christmas tree ornaments made from yarn and felt.  Plus a video tutorial. Learn how to make this Christmas craft.

…And some have cute little hats.

Since they were so easy and fun, I made a video tutorial for all to enjoy.  Think of it as a Christmas present.


Snowman Ornament Christmas Tutorial

All you need to make them are:


Enjoy the video.


Here’s the updated list:

  • Snowmen
  • Elf
  • pouches
  • Coats

Two down, two more to go, and 6 days until Christmas. :o


Give it a try:

Read More »

Friday, December 15, 2017

Christmas Crafts: Diy Elf on a Shelf with Outfit Tutorial

This post may contain affiliate links, please check out my disclosures page for more info.  Thanks!

For my first project for Christmas, here’s…

A diy elf on the shelf all dressed in felt sitting on top of a copy of the Elf on the Shelf book.

…The Elf on the Shelf.

A diy elf on the shelf all dressed in felt.

I started to think it would be fun to have one of these little elves around the house.  Then I started to think it would be more fun to make one instead of buying one.

And I’m not the first to think that.  I found this tutorial for a DIY elf, and decided to make a similar one.  Just without the clay and the vintage doll face which was too tricky to find, but super adorable.

A plain posable doll from the craft store, perfect for a homemade elf on the shelf.

Anyway remember that odd doll I bought at Joann (see A Late Black Friday Craft Haul).  I got it specifically to used for this project because it’s the same one used in that tutorial.  It poses nicely, so it’s perfect for elfishly good fun.

The doll's feet cut off and pinned to make new elf feet.

And just like in that tutorial, I prepared the doll by cutting off the feet and stitching the bottom of the legs shut.

However, from there I just did my own thing.  Basically all I did for my elf is make it a cute little elf outfit and decorate the face.  It was so much fun, I wanted to share it with you.


Elf on the Shelf Tutorial


Materials:

Diy elf on the shelf clothes pattern and tutorial.

Here’s the pattern for the clothes. 

If you chose not to cut the doll’s feet, you will either need to make the pants about 1.5 inches longer or cut off the tips of the pants before sewing.  Then you will have normal pants and just need to make your elf some shoes.

The clothing pieces are made in simple shapes, so this would be perfect for a beginning sewing project for a child, with adult supervision of course.

Diy elf on the shelf clothes tutorial with pattern.  Make your own easy elf on the shelf.

First cut two shirt pieces and pin.  Sew along the sleeves and down the sides. 

You can sew by hand using a running stitch, but I recommend using a backstitch (if you don’t know how to do a backstitch, check out my video tutorial for doll drawstring tank tops).

Diy elf on the shelf clothes tutorial with pattern.  Make your own easy elf on the shelf.

When done sewing, carefully clip the seam allowance at the armpits so it will look better when turned right side out. 

Try not to accidently cut the thread or you will have to re-sew it (I did it three times while sewing this outfit!).

Diy elf on the shelf clothes tutorial with pattern.  Make your own easy elf on the shelf.

Turn the shirt right side out and try it on the doll for fit.  You will need to cut down the back to make an opening.

Diy elf on the shelf clothes tutorial with pattern.  Make your own easy elf on the shelf.

Looks great right?

Diy elf on the shelf clothes tutorial with pattern.  Make your own easy elf on the shelf.

Now pin on the collar and sew in place.  If you’re feeling lazy, you could glue it on instead.

Diy elf on the shelf clothes tutorial with pattern.  Make your own easy elf on the shelf.

Now cut two pieces for the pants and pin and sew.  Just like with the shirt, you clip at the crotch and around the feet.

Diy elf on the shelf clothes tutorial with pattern.  Make your own easy elf on the shelf.

After turning right side our try it on the doll.  It will be a snug fit, so getting them on may be a bit tricky.

If you are making this with a kid, you will probably need to help them.

Diy elf on the shelf clothes tutorial with pattern.  Make your own easy elf on the shelf.

Cut one piece for the hat and hat trim and sew (or glue) the trim along the curved edge of the hat.

Diy elf on the shelf clothes tutorial with pattern.  Make your own easy elf on the shelf.

Then fold the hat in half and sew along the straight edge to form a cone.  Clip the point at the top before turning right side out.

Diy elf on the shelf clothes tutorial with pattern.  Make your own easy elf on the shelf.

And here is your little elf hat.

Diy elf on the shelf clothes tutorial with pattern.  Make your own easy elf on the shelf.

Cut two pieces for each glove (4 pieces total).  Sew around and clip before turning right side out.  Easiest gloves in the world.

Diy elf on the shelf clothes tutorial with pattern.  Make your own easy elf on the shelf.

Time to dress your little elf.

Diy elf on the shelf clothes tutorial with pattern.  Make your own easy elf on the shelf.

You can simply sew or glue the back of the shirt closed.  However, if you want to make the clothes removable just sew on snaps or Velcro.

Diy elf on the shelf clothes tutorial with pattern.  Make your own easy elf on the shelf.

Before attaching the hat (if you want to), it’s time to add a face to this little guy.  Just draw a little face in pencil, then draw over with fabric markers.

Diy elf on the shelf clothes tutorial with pattern.  Make your own easy elf on the shelf.

Here’s how mine turned out.  I used the beaded eyes as the pupils and drew the rest of the eye parts along with nose, mouth, chin and eyebrows.

I added a touch of pink for the cheeks and in the corners of the nose and mouth.  A little bit of blue and purple to the eyes, and he has a face.

Truth be told, I kind of think it looks cuter with the blank doll face, but an elf needs a smile. 

Diy elf on the shelf clothes tutorial with pattern.  Make your own easy elf on the shelf.

For hair, I made several strokes using both yellow and brown to make it pop more.  He has highlights! 

The nice thing about the hair is if you mess up you can hide it under the hat.

An diy elf on the shelf, now fully dressed.

And there you have your completed elf doll.  All he (or she) needs is the book.

A used copy of the The Elf on the Shelf book, purchased from a public library.

I found this copy at the bookstore at my local library, or rather it found me.  I just walked in the door and there it was, for only $3 too.  It was fate.

For those who aren’t as lucky though, you can find the book on amazon among other places.

The finished elf on the shelf in all his diy glory!

Book or not, you can still have tons of fun with these elves.  Try not to get too carried away. :)

Here’s the updated list:

  • Snowmen
  • Elf
  • pouches
  • Coats

One down, three more to go, and 10 days until Christmas.  Oh, dear.


Give it a try:

Read More »

Popular Posts