Search This Blog

Featured Post

Simple Flower and Lace Headband Tutorial

This post may contain affiliate links, please check out my disclosures page for more info.  Thanks! As promised yesterday, here is my headb...

Showing posts with label dolls. Show all posts

Wednesday, October 31, 2018

Sewing for Dolls: Some Last Minute Halloween Costumes

This post contains affiliate links, please check out my disclosures page for more info.  Thanks!

I cut it really close for this next craft project, but at least they are finished.  Just in time for Halloween.

Four little dolls dress up for Halloween in homemade costumes complete with cute pumpkin buckets.

Doll sized Halloween costumes.

I got my 1/6 scale ball jointed dolls all ready for Halloween.  Or should I say they got themselves ready?  Check out the doll blog to see, also to learn how to make some of these costumes for your own dolls at home. 

Doll halloween costumes 02 (465x640)

For this one (Yuna), it’s a super easy ghost costume.  Just need to cut some sheer gauzy fabric and slip it on.

My sister thought I should do it like on the Charlie Brown Halloween special, maybe next year.

Doll halloween costumes 03 (640x592)

This little boy is just wearing the cat eared headband I made previously.  Check out my doll headband video tutorial to make one, it works for dolls of all sizes.

Doll halloween costumes 04 (640x527)

For the next costume, you can see here how the doll (Sakura) “made it herself”.

Doll halloween costumes 05 (476x640)

It started as a simple robe, that could work for a wizard.  Don’t forget to check out my doll blog to see how to make it.

Doll halloween costumes 06 (342x640)

But, flip it around and throw on a hat, and it’s a classic witch costume.

Doll halloween costumes 08 (483x640)

The next costume (for Momoko) started as a doll swimsuit with a tutu, instant ballerina.

Doll halloween costumes 07 (640x383)

The tutu is made from a long piece of tulle folded in half with some elastic. 

Doll halloween costumes 09 (640x620)

But, take one of these butterflies from Dollartree and glue on a clip…

Doll halloween costumes 010 (579x640)

…Then clip it on my doll’s clothes for wings…

Doll halloween costumes 011 (468x640)

…And now it’s a fairy costume.

All the dolls dressed and ready for trick or treating, but one more thing.

Doll halloween costumes 013 (640x612)

These little buckets.  I was lucky enough to find them at Goodwill, but they actually sell them at Party City.

You can find the pumpkin buckets here and the Cauldrons here.

Doll halloween costumes 014 (491x640)

They are just the right size for my dolls, and add just the right touch to my doll sized Halloween.

Here’s the updated list:

  • Costume
  • Case
  • Doll and Kitty
  • Little Halloween
  • 3 Skirts
  • Accessories
  • Socks
  • Overalls
  • Ornaments
  • More Cases

Two down, eight more to go.  Happy Halloween everybody.


Give it a try:

Read More »

Sunday, September 30, 2018

Quick and Easy Dollar Store Tea Set Makeover

This post may contain affiliate links, please check out my disclosures page for more info.  Thanks!

Finally, the last project on my list.  A pretty tea set.

Quick and Easy Dollar Store Tea Set Makeover

I wanted another cute little porcelain tea set for my dolls and stuff.  You used to be able to find them at most dollar stores.  Sadly that’s not the case anymore. 

So, I did the next best thing.

A pink and yellow plastic toy tea set bought from Dollar Tree, a dollar store chain.

I got a plastic set instead (see the doll blog for their reaction).  You can find this tea set at Dollar Tree as well as most dollar stores.

It’s the right size and is sort of cute, but the colors are kind of tacky.  The easiest way to fix the color issue was to paint it.

So let’s paint some plastic!

Getting ready to paint the tea set using acrylic paints, glossy Mod Podge, cheap brushes, a paper plate and one other tool.

I gathered up some supplies I had on hand and got to work.  I used acrylic paints, paint brushes, a paper plate for the paint, and glossy Mod Podge

The Mod Podge protects the work and makes the pieces shiny and pretty.

The strangest tool needed, emory boards for nails.  Can also use fine sandpaper.  Just lightly sand the surface of the plastic pieces before painting them.

I also used these, nail emery boards.  You could also use fine sand paper, but I used these because it’s what I had around.

So first, I lightly sanded the surface of all my pieces.  This helps the paint stick on better, or so I’ve been told.

Paint the pieces with 1-2 coats of white paint as a base.  Let dry  between coats.

Then I applied 2 coats of white paint to all the pieces, allowing them to dry between coats.  I painted one side of each piece at a time.

I was going to paint the pieces a different color after the white paint dried, but I decided they looked pretty that way and went with it.

Adding pink paint to bring out the details in the cute dishes and cups.  There are little hearts and flowers!

I then added some pale pink paint to bring out some of the details.

Finish with one 1-2 coats of glossy Mod Podge to protect and make it shine.

And finally, I applied two coats of the glossy Mod Podge (allowing to dry between coats) to seal and finish them.

The tea set looks so much nicer now.  The gloss makes the pieces look very porcelain-like, but since they are plastic I don’t have to worry about dropping them.

A close up of one of the tea cups, looks a little like porcelain now with the gloss.

I could have painted little designs on the cups like flowers and such if I wanted to, but maybe I will save that for another set.

A close up of the tea pot, it looks great too.

I really like how cute the tea pot came out.  There were little roses around the heart that I didn’t even notice until I started painting it.

A close up of one of the dishes, you can really see the cute heart pattern.

The plates look really pretty too, the hearts are so sweet.

A close up of one of the spoons.  It is painted white with pink on the inside.

I added a touch of pink to the spoons to tie them into the set, also because painting them white made them look too much like “disposable” plastic spoons.  Maybe next time I’ll try using a silver or gold paint.

The finished teaset in all its glory.

Over all, I think the tea set looks great and it would be fun to paint more of them in the future.

Here’s the updated list:

Six down and out.


Give it a try:
Read More »

Thursday, September 20, 2018

Sewing for Dolls: Pink Sweater Set with Navy Skirt

This post may contain affiliate links, please check out my disclosures page for more info.  Thanks!


After way, way too much time away, I finely have gotten around to posting my next project.  More doll clothes!

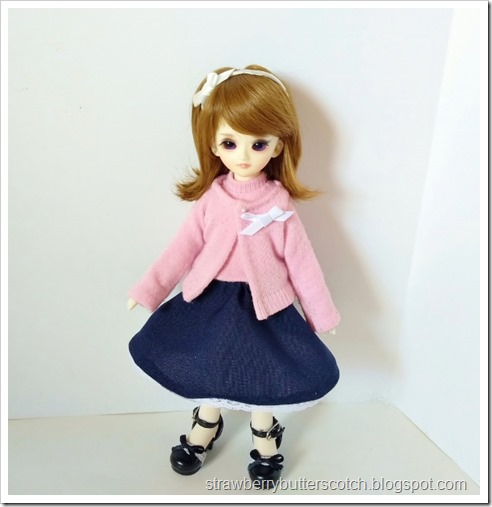
A cute doll outfit.  A pink sleeve less top with matching sweater, a navy blue skirt and a detachable bow pin.

One of my ball jointed dolls has been long overdue for a new outfit.  I had visions of pink and navy blue in my head, so I made this cute and classic set.  There’s a pink “sweater set”, a navy blue half circle skirt, and a tiny bow pin.  I wanted to add a cute beret, but my fabric choices weren’t cutting it.

The cute doll outfit worn by a ball jointed doll.

Here’s the new doll outfit worn by it’s cute owner.  (By the way, the headband she is wearing is made from this tutorial.)

Close up of the pink sock sweater.

The sweater set was made from a pair of pink knee socks (like these).  I just made another sock sweater and whipped up a knit top to go underneath.

The doll with the sweater removed to show off the sleeveless knit top.

The top is sleeveless because this is Arizona and Summer temperatures last into “Fall”. :(

The small ribbon bow.

The easiest piece to make was the bow pin.  Just make a tiny bow with ribbon (here’s a video for it), then flip it over…

The back of the ribbon bow showing off a tiny gold safety pin sewn on.

…And sew on a tiny gold safety pin.  Easy doll sized pin done!

Showing off the navy blue skirt worn by the doll.  You can see her cute shoes too.

The skirt is another doll sized half circle skirt, just made smaller for this 1/6 scale doll instead.  I used more of the poplin fabric leftover from other projects (a dress, a costume, a bag, and still counting).

If you’re interested in making this outfit for your own yosd sized ball jointed dolls or similar sized dolls, I whipped up a tutorial for the whole outfit with patterns for the skirt and top, instructions and other links.  You can find it here on my doll blog.

Here’s the updated list:

Five down, just one more to go.  So close!


Give it a try:
Read More »

Friday, July 13, 2018

Crafting for Dolls: Straw Hats to Half Bonnets

This post may contain affiliate links, please check out my disclosures page for more info.  Thanks!


Later than planned, but here is the last project on my craft list.  Finally.

Some small bonnet style straw hats from a craft store.

Some time ago, I found a package of small bonnet style straw hats at Bookman’s.  They were only 50 cents!

A small bonnet style straw hat from a craft store.  Let's turn it into a doll half bonnet!

I bought them thinking I could make pretty bonnets for my ball jointed dolls, until I tried them on them.  They were too small, even for my smallest dolls!

What do you do with too small doll straw hats?


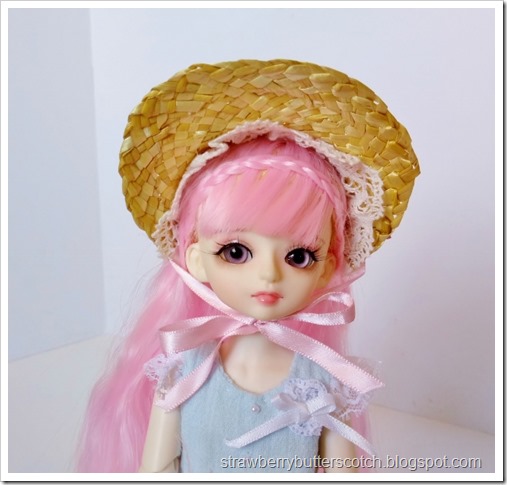
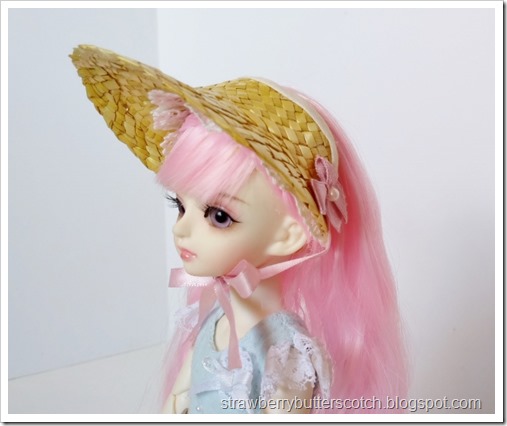
A pink haired ball jointed doll wearing a pretty half bonnet with pink bows.

You make half bonnets.

Years ago, I came across a tutorial for taking a child size straw hat and turning it into a half bonnet.  Surprisingly I still remembered it, so I thought “why not try that for a doll?”

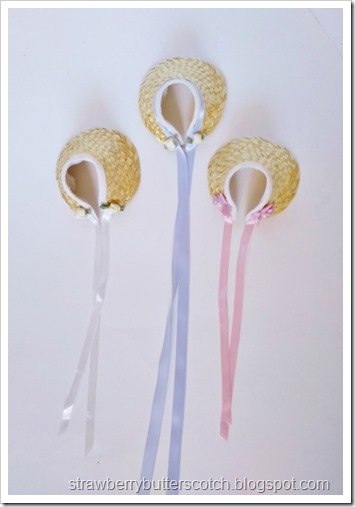
Three doll sized half bonnets made from craft store straw hat with ribbon, bows, and flowers.

So I made three ball jointed doll sized half bonnets.  They came out so cute!

The side view of a doll wearing a half bonnet.

They are trimmed on the outside with flowers and bows with ribbons for tying.

Three doll sized half bonnets, you can see the ruffled lace on the inside of the bonnet.

On the inside, I added ruffled lace to frame the doll’s face.  And it’s a great way to use up lace scraps.

The front view of a pink haired bjd wearing a pretty bonnet.

See, doesn’t it look so pretty on Yuna?

A white haired ball jointed doll wearing a straw half bonnet with a pale purple ribbon.

Not that they don’t also look lovely on Hikaru here, I mostly intended to make the bonnets for her anyway.

Two ball jointed dolls showing off their new half bonnets.

If you are interested in making some of these half bonnets for your dolls, I whipped up a quick tutorial on my doll blog.

Here’s the updated list:

Ten down and out.  Finally finished this list! 

So now to start up on the next one.  I will have it posted by Sunday.  Look forward to it!


Give it a try:

Read More »

Tuesday, June 19, 2018

Sewing for Dolls: Faux Button Down Tank and Half Circle Skirt for Bjds
This post may contain affiliate links, please check out my disclosures page for more info.  Thanks!

I said this post was going to be “a little” late, then it ended up being super late.  I finished the project then got distracted by a few things, but that’s for another post.

Anyway, I got another ball jointed doll several months ago from a Black Friday sale, and I hadn’t gotten around to actually making some clothes for her, until now.

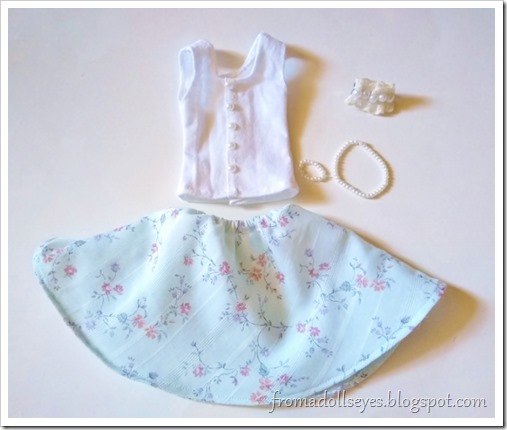
A cute outfit for  a ball jointed doll.  A white tank top with

Using a few scraps of fabric and such, I whipped up this cute outfit.  A white button down tank top, a floral skirt, a hair clip and a pearl necklace with bracelet.  It’s perfect for a nice Spring/Summer day.

A half circle skirt made for a ball jointed doll.  It is made with a pale blue floral print fabric and has an a-line shape to it.

The skirt is a half circle skirt made based on this tutorial for a little girl’s skirt.  I used scraps of fabric leftover from this dress I made years ago.

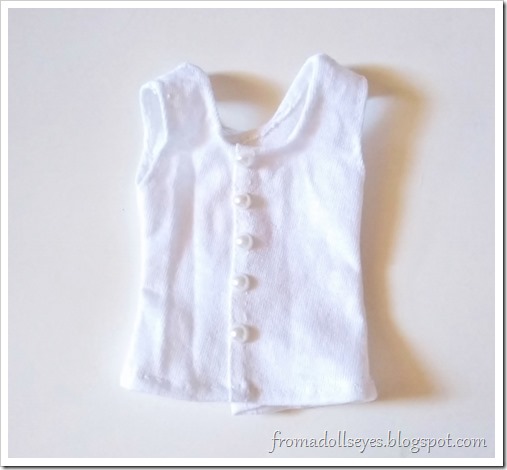
A white doll sized tank top with faux pearl "buttons" down the front.  The button front is fake, the top opens in back with velcro.

The tank top is made from a cut up t-shirt, t-shirts are the best for doll clothes and other fun crafts!

It opens on the back with Velcro, it only looks like it buttons in front.  Those “buttons” are actually flat back pearls glued in place with Aleene’s Jewel-it.

A pretty ball jointed doll wearing her new hand made outfit.  A white tank top with "buttons" down the front, a floral print skirt, a lacey hair clip and a pearl necklace with matching bracelet.

Both the top and and skirt look so pretty on my doll (her name is Misako and she is a 1/4 scale doll).

And like most of the clothes I’ve been making for my bjds, I made patterns and a tutorial for these pieces here on my doll blog.  Check it out if you have dolls about this size, or if you just want to know how I made the fake button front on that tank top.

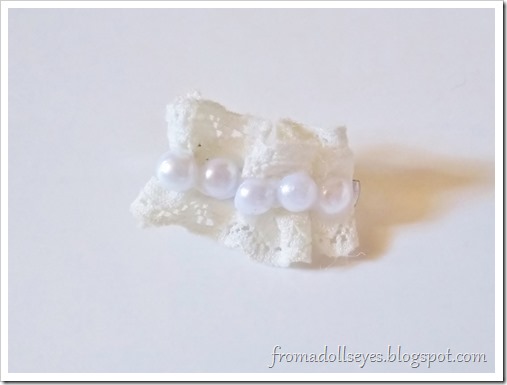
A hair accessory for a doll make with a scrap of gathered lace and some flat back pearls glued down the center.

Now for the accessories.  I whipped up this hair clip in less than 10 minutes.  It’s just a scrap of pretty lace that I gathered to size and glued on to a barrette.  Then I added some pearls.

A side view of the doll's hair clip showing off the small barrette used as a base.

The barrette is a little larger than 1/2 an inch (about 1 cm.), I bought it as SAS.  There are about the right sized to make large-ish hair clips for dolls.

A hair accessory for a doll make with a scrap of gathered lace and some flat back pearls glued down the center. Shown worn by the doll.

It does looks nice in my doll’s hair.  Makes me want to make tons more of them, but that will be for another day.

A pretty ball jointed doll wearing her new hand made outfit.  A white tank top with "buttons" down the front, a floral print skirt, a lacey hair clip and a pearl necklace with matching bracelet.

Throw in the pearl necklace and bracelet (which were just made by stringing faux pearls on elastic) and the outfit is complete and adorable.


Here’s the updated list:

Eight down, just two more to go.  The next one will be up in a couple of days.  Look forward to it!

Read More »

Friday, April 20, 2018

Sewing for Dolls: Socks and Lingerie? Plus Tutorial Links

My latest craft project is doll clothes, so why did it take so long to post?  You will see shortly.

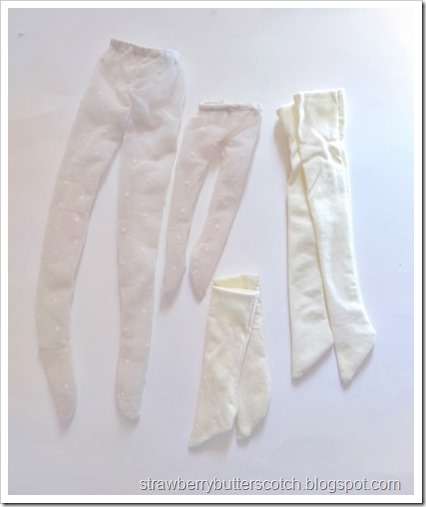
Several pairs of doll sized tights and socks made out of old tights.

First I made several pairs of tights and socks, several more pairs to be exact.  I made some before out of old tights (see From Socks to Doll Sweaters), but I’ve gotten more ball jointed dolls since then.  Meaning more itty bitty feet to cover.

Doll sized thigh high socks made from old tights.

No complaints though, doll socks and stuff are fun to make and so cute.  Look at these adorable thigh high socks I made for my newest doll (her name is Misako).

Cute crew socks for a doll made from old tights.  As worn by a ball jointed doll with black shoes.

And I made this pair of crew length socks for my only boy ball jointed doll (the last thing I made for him was these cute t-shirts).

A close up of a ball jointed doll wearing her new tights made from a pair of old tights.  She is also wearing cute shoes with ankle straps and a pink dress.

And finally I made two pairs of tights, a pair for my newer doll and a smaller pair for this one (her name is Momoko).  I used a cute lacey pair of tights that had dots all over them.  I found them at 99 Cents Only Store.

The best part is that this time I managed to make some printable patterns for all theses socks and tights.  They are sized for msd (1/4 scale) and yosd (1/6 scale) ball jointed dolls, and are included with this tutorial posted on my doll blog.

Now for the more interesting part of this project. 


Doll Lingerie

As expensive as ball jointed dolls can be, sometimes they don’t even come with underwear.  So you either have to buy them separately or make them yourself. 

Naturally I went with making them.  And if I’m going to sew doll sized undies, then I’m going to make them cute!

Two doll sized bra and underwear sets made from lace, ribbon and t-shirt fabric.

I made these two sets from t-shirt scraps, lace, ribbon and a bit of elastic.  They were actually pretty easy to put together.

To make these underwear sets, I first did a bit of “research” mostly to figure out how to make a doll sized bra.  I found several cute doll tutorials (mostly videos), including these:


A doll sized bra and underwear set made from lace and t-shirt fabric.

This one was the first set made.  I use thin lace for the band and the straps of the bra and used the same lace on the matching underpants.  It’s simple and cute.

A doll sized bra and underwear set made from lace, ribbon and t-shirt fabric.

For the second undie set, I used thin ribbon for the bra straps instead of lace.  Then I made little bows for the front of the bra and underpants.  For the other set I threaded the elastic through the waist, but with this one I stitched decorative elastic on to the fabric.

Because they were so cute and fun to make, I made a tutorial for MSD (1/4 Scale) ball jointed doll sized underwear and bras on my doll blog, feel free to check it out if you or someone you know has dolls around this size (or if you just want to laugh at my doll’s crazy antics).

Here’s the updated list:

Four down, six more to go.  I should have the next project up in about a week, but first there may be a little surprise.  Look forward to it!

Read More »

Popular Posts