Search This Blog

Featured Post

Simple Flower and Lace Headband Tutorial

This post may contain affiliate links, please check out my disclosures page for more info.  Thanks! As promised yesterday, here is my headb...

Showing posts with label ribbon. Show all posts

Sunday, July 29, 2018

Plastic Caddy to Pretty Headband Holder


This post may contain affiliate links, please check out my disclosures page for more info.  Thanks!

For the first project on my new craft list, I decided to fix a storage problem in a pretty way.

A pile of pretty headbands, mixed up and cluttered.

I have made a ton of cute headbands overs the years to go with pretty outfits.  The problem with having all these nice hair things is storing them so they don’t get tangled up in a heap like this, or damaged.

A simple plastic storage caddy, the solution to our messy head band problem.

The solution is this, a simple plastic caddy.


I got this one for free from a friend, but I found similar ones here at DollarTree.  They are useful to store all kinds of things neatly and within reach.

Plastic Caddy to Pretty Headband Holder.

However, for hair accessory storage I wanted something prettier. 

So, that’s what I did, I made the caddy prettier, to turn it into the perfect headband holder.

Two plastic bins full of laces, ribbons, bows, flowers and other embellishments.  These will be used to make the plastic caddy all pretty.

First I whipped out my embellishments.  The container on the right is where I keep all my lace and ribbons, and the one on the left is full of smaller bits of ribbon, flowers, bows and other random small stuff.

Lately, I gotten into sorting and organizing all my craft supplies, mostly using plastic shoebox size containers and cute baskets.

Start gluing the lace around the caddy with a glue gun.

I picked out some wide lace, and started carefully gluing it around the caddy with a glue gun.

Finish gluing the lace by folding the end before gluing down.

When I got it completely around the caddy, I folded the edge of the lace before gluing it down.

Gluing ruffled lace along the top edge of the caddy with a glue gun.  Careful, it's really hot.

Then I did the same thing with some pretty ruffled eyelet lace.  I glued it along the edge of the container.  I had to be extra careful here, because it’s easier to get burn gluing there.
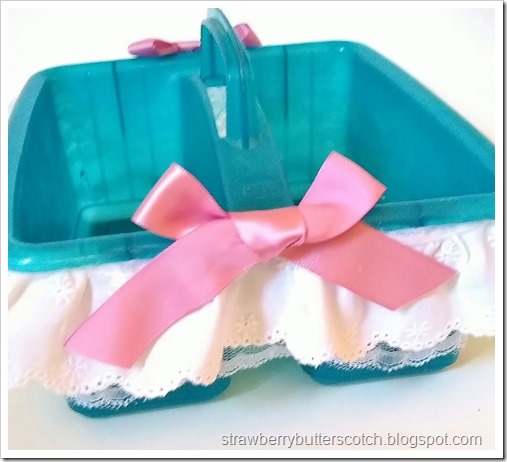
Glue cute pink ribbon bow to the sides of the caddy as a finishing touch.

To finish it off, I made two large-ish bows from some leftover ribbon and glued them to the sides of the caddy.  This ribbon was left over from this pretty pink dress I made for Easter a while ago.

The finished and nicely decorated plastic caddy, now a pretty headband holder.

And now it is done, and ready for use.
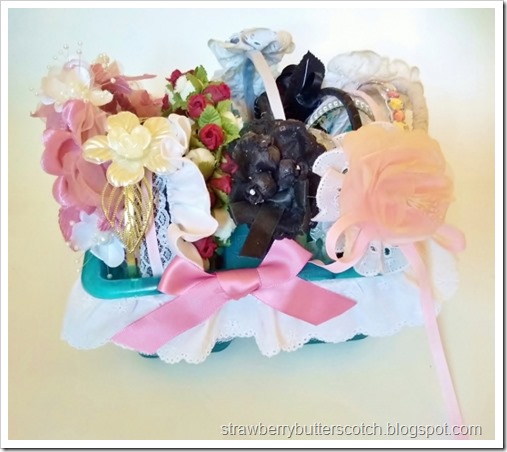
The pretty caddy full of mostly home made headbands.

See, doesn’t that look much better?  And it actually took about 15 minutes to do.  Maybe I should make more.

Here’s the updated list:

  • 3 piece outfit
  • Holder
  • First aid cases
  • Umbrella
  • Tea set
  • Tote

One down, five more to go.  The next two should be up soon, look forward to them!


Give it a try:

Read More »

Thursday, March 29, 2018

Simple Flower and Lace Headband Tutorial

This post may contain affiliate links, please check out my disclosures page for more info.  Thanks!

As promised yesterday, here is my headband tutorial.

Simple Flower and Lace Headband Tutorial

I will show you how to make this simple head band, accented with a pretty fake flower.

Materials needed to make a flower lace head band.  Wide lace, blank headband, ribbon, flower, glue gun, and scissors.

Materials needed:

  • Glue gun with glue.
  • Ribbon.
  • A large flower.
  • A lace rosette, check out my video tutorial if you don’t know how to make one.
  • Scissors.
  • A plain headband, I prefer metal ones because they can be adjusted to fit your head without breaking.
  • Any other embellishments you want.


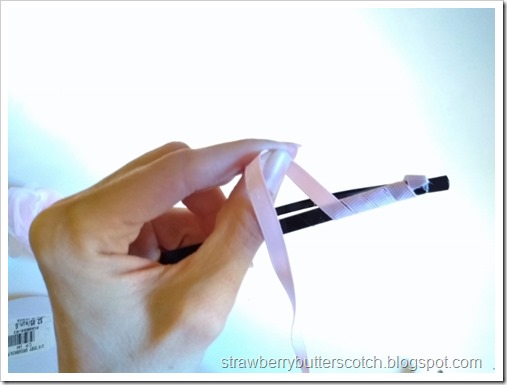
Making a flower and lace headband.  Wrap ribbon around the headband, glueing as you go.

First, glue the end of the ribbon to the end of the headband to start covering it.

Making a flower and lace headband.  Wrap ribbon around the headband, glueing as you go

Proceed to carefully wrap the ribbon around the head band, applying glue as you go.  Be careful not to burn yourself on the hot glue.

Making a flower and lace headband.  Wrap ribbon around the headband, glueing as you go.

When you get to the other end, cut the ribbon and glue down the end.

Making a flower and lace headband.  Wrap ribbon around the headband, and when finished you may wrap more ribbon on the ends for a polished look.

If you want,  you can wrap a little extra ribbon on the ends of the headband.  This will give it a more polished look, but I’m too lazy for that.

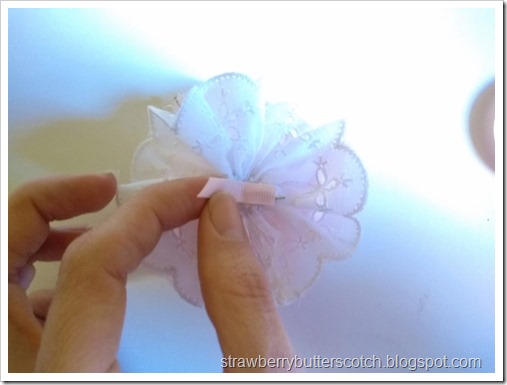
Making a flower and lace headband.  Add the flower to the lace rossette.

Now for the flowers.  If your flower has a wire stem like mine, you will want to stick it through the center of the rosette.

Making a flower and lace headband.  Add the flower to the lace rossette.

It looks kind of cute like this. :)

Making a flower and lace headband.  Add the flower to the lace rossette.

Then you twist down the wire, so it lies flat and add some glue to secure it.

If your flower doesn’t have wire, you can just glue it to the center of the rossette.

As an alternative to the large flower, you can use a cluster of three or more smaller flowers.  Use whatever you like.

Making a flower and lace headband.  Use some ribbon and glue to attach the flower piece to the headband.

Moving on, glue the end of the piece of ribbon over the center of the back of the flower and rossette piece.

Making a flower and lace headband.  Use some ribbon and glue to attach the flower piece to the headband

Wrap this ribbon around the headband…

Making a flower and lace headband.  Use some ribbon and glue to attach the flower piece to the headband

…Then glue down to attach the piece to your headband.  Make sure it is where you want it on the headband before you glue it.

Making a flower and lace headband.  Use some ribbon and glue to attach the flower piece to the headband

Now it is ready for more decorations.

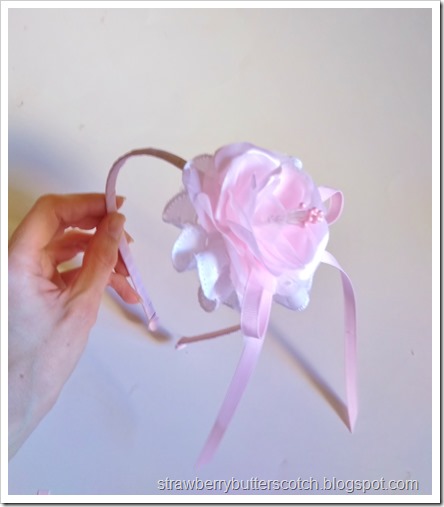
Making a flower and lace headband.  Add a ribbon bow and anyother embellishments you want, then you're done!

I added a ribbon bow with long tails (check out my simple bow video tutorial if needed), because I thought it looks pretty.  You can add jewels, strands of pearls, or anything else you want.

Enjoy the headbands and have a happy Easter.


Give it a try:

Read More »

Tuesday, May 2, 2017

More Pink for Baby

This post may contain affiliate links, please check out my disclosures page for more info.  Thanks!

So much for getting my next project up in a timely matter.  I finished this one right on time, but it only took me about a week and a half to post it.  Grrr.

Anyway, some more friends are expecting a baby, this time it’s a little girl!  So more baby stuff.  And because I couldn’t resist, it’s all pink!

Pink pillow case dress for baby.

First up is the baby dress.  It’s a pillow case style dress.  I already knew how to make it because I’ve made similar tops (including this doll version with a tutorial), but I found this tutorial for baby dresses extremely useful.  It gives you measurements to use based on the age of the baby or toddler.  Useful when you don’t have a kid to measure.

It’s trimmed with eyelet lace at the bottom, and I used some cute pink grosgrain ribbon for the ties.  All I had to do was hang it on a cute pink hanger and it was ready to go.

Decorating children's hangers.

Speaking of hangers, I bought a pack of pink children’s hangers for a dollar.  I thought that since this was a baby girl who will definitely receive lots of cute dresses from friends and family, the parents will need hangers.  They will need to store it all somehow.

Add a bow to make cute hangers.

And why not make them cute too?  Simply adding a nice ribbon bow to the top does the job.

Add a bow to make cute hangers.

And now we have a full set of cute girly hangers ready for use.  I think I might need to do this to my own hangers too.

Pretty baby headbands using tights.

To go along with the dress, and possibly all the other ones in her wardrobe, I made these cute baby head bands.  The one on the left has a eyelet lace rossette (tutorial!) accented with a pink bow made from the same ribbon as my baby dress and hangers.

The one on the right has a ribbon rose made with some ribbon left over from my Easter dress.

Pretty baby head bands using tights.

The unique part is what they are attached to, a loop cut from tights.  I got the idea from this tutorial for baby headbands.  It’s stretches enough to fit baby or even mommy’s head, but its soft and gentle.

Cute plush bunny for baby.

The final piece is this stuff bunny, because toys are mandatory.  I call it the potato bunny because the shape of the body without legs reminds me of a potato.  Strange? Yes. Cute? Definitely.

Cute baby bunny plushie.

The face is just a wee little nose made of felt and two faux pearls for eyes.  Don’t worry, I took extra measures to make them secure and baby safe.  It would take a strong force to pry these eyes off.

A simple bow makes it cute.

To finish it off, I tied on a ribbon bow.  Yep, it’s the same ribbon from the other pieces.  All the baby presents are finished.  And all that’s left is to wait for the baby to be born.

Here’s the updated list:

Three down, two more to go.  And they both will be almost as cute as the baby stuff.  Look forward to it!

Give it a try:

Read More »

Sunday, July 17, 2016

5 a Week: Lace and Ribbon Jewelry

This post may contain affiliate links, please check out my disclosures page for more info.  Thanks!

It’s Sunday, and time for week 6 of this year’s edition of…

5 a Week: Lace and Ribbon Jewelry
…The Five a Week Pledge.
If you haven’t been around here, it’s where you pledge to do five things each week of your choice (see here for more info).  I pledged to make five small crafts each week.  Feel free to grab a button and join me.  If you already have, post a comment or a link to share what you accomplished.
This week’s craft:

Jewelry!

5 a Week: Lace and Ribbon Jewelry

I made five pieces of jewelry with lace and ribbon.  And this time they are sized for people instead of dolls (see 5 a Week: Jewelry for Dolls).  I made three easy necklaces and 2 bracelets.

5 a Week: Lace and Ribbon Jewelry: Trying out jewelry clamps

The main reason I wanted to make the necklaces was to try out these ribbon clamps.  I bought them on impulse ages ago and had never used them (see The Biggest Craft Haul Ever).  In fact this was the first time I used anything like these.

5 a Week: Lace and Ribbon Jewelry

First I just used them with some thin lace and clasps to make these simple chokers.  I may add pearls or a charm later, but they are cute like this.

5 a Week: Lace and Ribbon Jewelry

I also tried something a little less simple, wider lace with ribbon layered on top.  The clamps aren’t too difficult to use, but they came out a little crooked since it was my first time.  And I wasn’t sure if I tightened them enough, so I used a little super glue just in case.

5 a Week: Lace and Ribbon Jewelry

While I was at it, I decided to make some lace and ribbon bracelets to match.

5 a Week: Lace and Ribbon Jewelry

Instead of the clamps and clasps, I stitched a hook and loop on each one.  It’s similar to some other pieces I made last year (see 5 a Week: Chocolate and Cream). 

The necklaces came out well I think.  And maybe after practicing some more with the clamps I will make a tutorial, or two.  Wouldn’t that be fun?  :)


Give it a try:

Read More »

Sunday, June 12, 2016

5 a Week: Jewelry for Dolls

 
It’s Sunday, and time for week 1 of this year’s edition of…
 
5 a Week: Jewelry for Dolls
…The Five a Week Pledge.
If you haven’t been around here, it’s where you pledge to do five things each week of your choice (see here for more info).  I pledged to make five small crafts each week.  Feel free to grab a button and join me.  If you already have, post a comment or a link to share what you accomplished.
This week’s craft:

Doll Sized Jewelry

Most of the projects from last year were doll items because I had just gotten my ball jointed doll (see Catching Up: A New Friend) and because small things like doll clothes, etc. are perfect for this challenge.  I thought since I got another doll (see Two of a Kind Doll Dresses), that I should continue this idea so she can have plenty of things too.

5 a Week: Jewelry for Dolls

That being said, this jewelry wasn’t actually made for the new doll.  I made one bracelet for her but the rest is for the older doll, Hikaru (See my doll blog for her reaction to the jewelry). 

It’s been a year since I got her so it’s technically her “birthday”.  Actually it was her birthday last month, I got her toward the end of May and in my head I thought it was June.  Anyway, jewelry is a perfect present for a doll right?

5 a Week: Jewelry for Dolls: Pearl Bracelets

First up is the bracelets, as modeled by my new ball jointed doll, Usagi.  The two on the left are simply faux pearls on elastic, I added a bow to the one on the right because I made it for Usagi. 

They are made with larger pearls than the ones for the necklaces because the elastic was too thick to use for the small pearls.  No problem, there’s nothing wrong with having a chunkier bracelet.

5 a Week: Jewelry for Dolls: Pearl Necklace

Now the first necklace was made with the smaller pearls strung together with an ordinary clasp at the back.  Simple as can be but very cute.  I bought these pearls ages ago at Joann Fabric and Crafts intending to eventually make doll necklaces (see The Biggest Craft Haul Ever).

5 a Week: Jewelry for Dolls: Pearl and Ribbon Necklace

I didn’t want the second necklace the same way as the first and I had plenty of the thin ribbon, so I tried this idea I found for making bracelets with beads and ribbon.  I’m afraid I can’t remember where I saw it, but I thought at the time that it was super cute an looked easy to do.  It took a bit of time even at doll size, but it was easy enough and the result is very cute.

5 a Week: Jewelry for Dolls: Pearl and Ribbon Necklace

And since ribbon is used, no need for a clasp.  I actually don’t like clasps and usually avoid them when I can.  I kind of want to make another one of these necklaces for myself now.

Now I have pretty necklaces and bracelets for my dolls, and good ideas for myself.  Now what’s in store for next week.

Read More »

Friday, May 6, 2016

How to Make a Ribbon Bow

I’m still working on the last two projects on my list and both of the projects actually involve making one or two little ribbon bows. 

How to Make a Ribbon Bow

A simple thing indeed, but I realized something.  Not everyone actually knows how to make these simple adorable little embellishments.  So I thought, why not tell them how?  So I made this quick little video tutorial showing how to make a ribbon bow.

Enjoy!

Read More »

Friday, March 25, 2016

Just Several Pretty Lace Accessories…

Finally some crafts from my list to show off.  Still have more to do before Easter, but at least these are complete and ready to share.

Pretty Off White Floral Print Purse with Eyelet Lace

I bought this pretty off-white floral print fabric for a particular project and I thought it would be great to use some of it for a small simple purse too.  One that I could wear with tons of different outfits instead of just that particular project.

Pretty Off White Floral Print Purse with Eyelet Lace

I made this bag roughly based on this easy messenger bag tutorial, just with a few little touches.  It came out ok, except I think I goofed a little on the edges where the strap is attached.  The strap by the way is made by twisting together four strands of ribbon into a cord.  I learned how to do it when I was about 10 years old.

DSCI5906 (800x658)

The purse is nicely trimmed with cream colored lace. I bought the lace years ago at SAS for $1 and have used it in tons of projects since.  I think it look great with this fabric.  The funny thing about the fabric is that when I got it home I realized I already had the exact same fabric in white instead of off-white.  I bought the white at Wal-mart and used it to make a dress (see Time for Some Catching Up).

Close Up of Lace Rosette Pin on Off-white Purse

The cute lace rosette on the flap is actually a pin.  I thought it would nice to be able to swap it out with other pins and broaches to make it easier to match different outfits.

Pins made from lace, ribbon, and fabric yo-yos

Speaking of other pins and broaches, I whipped up these four.  The two on the left are made from lace and fabric yo-yos with some ribbon bows.  The ones on the right are just bows made from wider ribbons with pin backs sewn on.  Simple yet effective.

Simple Pretty Lace Rosette Hair Clips

I also whipped up these simple hair clips using more lace rosettes with more of that cream colored lace.

Simple Pretty Lace Rosette Hair Clips

I just used hot glue to attach the rosettes to some clips.  I covered the clips with some ribbon first to make them look better, plus it helps the rosettes stay on better too.

Lace hair clips decorated with red ribbon pins

The beauty of these simple clips is that I can dress them up a bit if I want to by adding some of the pins.  See how well they look with the red ribbon pins?

Here’s the updated list:

  • dress
  • hair accessories
  • small bag
  • pins
  • clips
  • doll clothes
  • video

Three down, four more to go.  The next project will be up in a couple of days, but here’s a little sneak peek.

Preview of next projects using red floral fabric, lace, and ribbon.

Some lovely red floral fabric trimmed with lace and more red ribbon.  Still sewing down the ribbon by hand.  But what is it that I’m trimming?

Preview of next project made with lace and floral print fabric.

And here is a panel of fabric embellished with pin tucks and lace.  Now where is this going?  You will find out soon.  Look forward to it.

Read More »

Popular Posts