Search This Blog

Featured Post

Simple Flower and Lace Headband Tutorial

This post may contain affiliate links, please check out my disclosures page for more info.  Thanks! As promised yesterday, here is my headb...

Showing posts with label vintage. Show all posts

Thursday, December 7, 2017

School Uniform for Fall? or Sewing a Blue Dress

This post may contain affiliate links, please check out my disclosures page for more info.  Thanks!

The final project on my list is one I had intended to make over two months ago, but it just kept getting put off.  A crisp navy blue dress.

A while ago, I made a sailor uniform to wear to Phoenix Comicon.  I used some blue poly poplin material for the the collar and skirt, but I bought a much, much larger amount more than I needed.  I thought it would be useful for other projects.

For  awhile, I was thinking it would look great for a dress.  Something for Fall, though in my mind it kind of started looking like a school jumper.  Pair it with a polo and it works as a school uniform, right?

So let’s see.

A cute school-like jumper style dress made with navey blue poly poplin and trimmed with crocheted lace.

Do you think my new navy blue dress looks like a school uniform?  Maybe a little cuter than some of the pieces I’ve seen.

Simplicity 1061 women's dress pattern, for slight vintage looking a-line sleeveless dress with a matching bolero jacket.

I used the bodice from this pattern by Simplicity, but I made the straps a little more narrow both because the style of the pattern is too wide for my taste and because I’m a bit more on the narrow side compared to most store bought patterns anyway.
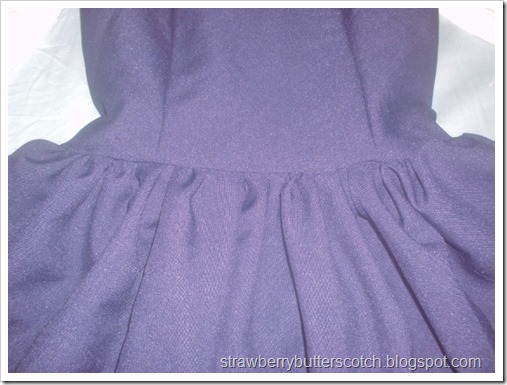
Making a cute school-like jumper style dress made with navey blue poly poplin and trimmed with crocheted lace.

For the skirt though, I opted to make a rectangle skirt instead with a gathered waistline.  In retrospect though, I think it would have worked better for this fabric to use an a-line skirt.  Live and learn.

Making a cute school-like jumper style dress made with navey blue poly poplin and trimmed with crocheted lace.

I trimmed the neckline with some nice white crocheted lace I bought at SAS (see A Spooky Black Craft Haul).  I wanted to add a bow or two as well, but I couldn’t make up my mind on where to stick it and what size.  It just leaves more room for broaches and other accessories (speaking of which, check out my button broach tutorial and lace applique broach tutorial).

Making a cute school-like jumper style dress made with navey blue poly poplin and trimmed with crocheted lace.

I added the same lace along the skirt.  The perfect way to complete this “school girl” look.

Here’s the updated list:

Seven projects down and out, but there’s no time to celebrate.  It’s time to start with the holiday crafting!  It will be a light list this year since it’s so close to Christmas, and I’ll have it up tomorrow.

For now, maybe a little bit of celebrating?


Give it a try:

Read More »

Monday, November 27, 2017

Sewing for Dolls: Pink Love, a Pretty New Dress

This post may contain affiliate links, please check out my disclosures page for more info.  Thanks!

After far too much time, here is my next project.  Finally!

And it’s more doll clothes, getting tired of them yet? 

A pink vintage style dress set for a doll.

Anyway, I whipped up this cute pink doll dress and accessories for my newest ball jointed doll.  It was actually really quick to make, once I managed to find the time to make it. 

Making a pink a-line dress for a doll.

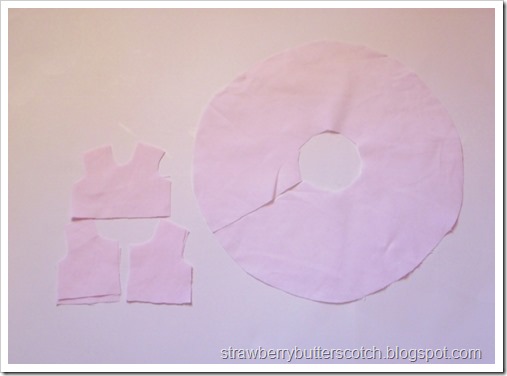
I used the pattern for the bodice of this blue doll dress I made before, but substituted the skirt for a circle skirt using this tutorial.

Making a pink a-line dress for a doll.

Following the same directions as the blue dress, I pieced them together, added some ribbon…

A pink vintage style dress for a doll.

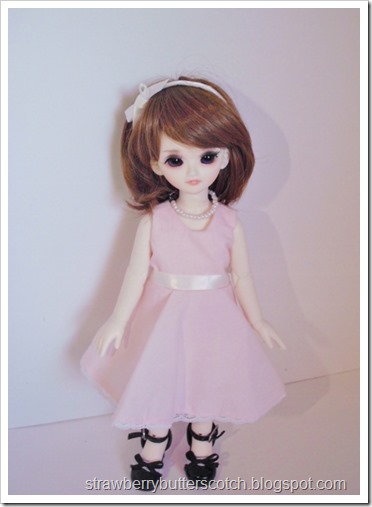
…And got this cute pink dress.

A pink vintage style dress set for a doll.

And it looks so adorable on my doll (check out the doll blog for what they have to say about it).  The circle skirt gives it a sort of vintage or retro look.

A pink vintage style dress set for a doll.

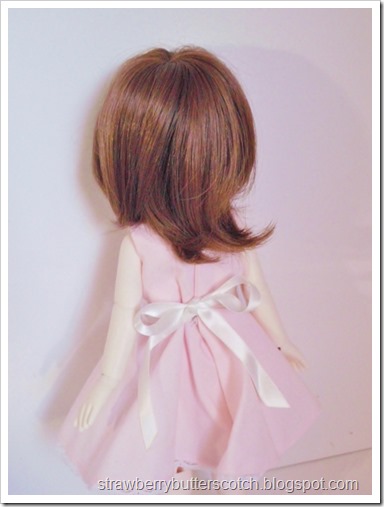
The ribbon around the waist ties in back making it extra adorable.

A pink vintage style dress set for a doll complete with pearl necklace.

To add to the vintage feel, I made simple necklace from small pearls.

A pink vintage style dress set for a doll.

And to complete the outfit, I made this simple headband using leftover ribbon (check out my doll headband tutorial to make your own).

Here’s the updated list:

Four down,  just three more to go.  And the next two will be up really soon for sure this time. :)


Give it a try:

Read More »

Sunday, October 9, 2016

Blue Plaid Revisited, a Dress Makeover

At last, the end of my craft project list has come, with another dress redo.

Making over a blue plaid dress, again.

Almost six years ago, I found a blue plaid “pioneer” looking dress at Goodwill and turned into this pretty dress (see Numbers Game and Perfect Heels). 

Fast forward years later, I started to think that it’s an okay dress but could be better.  I thought that it would look cuter as a jumper, maybe worn with a pretty blouse.

Making over a blue plaid dress, again.

So I started by removing the sleeves and cutting a new neckline.

Making over a blue plaid dress, again.

I used bias tape along the arm holes and neckline.  The only one I had around was this green wide bias tape, but since it wasn’t going to show the color didn’t matter too much.

Making over a blue plaid dress, again.

See, I used single folded bias tape so the green is only on the inside.  The real issue was the width.  A thinner bias tape is more preferable because it curves better and lies flatter when finished.

Making over a blue plaid dress, again.

All that was left to do was to trim the neckline with this beautiful crocheted lace.  You may have noticed it is the same lace I used for a recent skirt (see Vintage Floral - Pretty Dress to High Waisted Skirt).  It goes great with the plaid as well.

Changing a blue plaid dress to a blue plaid jumper.

And here’s the finished dress, shown with a long sleeved blouse.  It’s pretty nice, though I think I messed up a little cutting one of the arm holes.  And I think it would look better worn with a collared blouse.

Since I did remove the sleeves, I naturally had leftover fabric.  What can you always make with leftovers?

A blue plaid pleated skirt for a doll made from fabric scraps.

Doll clothes! 

I whipped up this cute pleated plaid skirt for one of my dolls (check the doll blog for more about it).

A blue plaid pleated skirt for a doll made from fabric scraps

It is cut on the bias so it slips on and off easily.  As always, I am tempted to make a similar skirt for myself.  Maybe someday.

Here’s the updated list:

Six down and out.  Finally finished this list, it only took me a couple of months.  What’s next?  You shall see soon, look forward to it.

Read More »

Sunday, September 25, 2016

Vintage Floral – Pretty Dress to High-Waisted Skirt

After far too long, I finally finished another project on my craft list.  Not exactly the one I had plan to finish next either.  That one hit a few snags, but I will finish it eventually.

Transforming a vintage style dress to a high-waisted skirt.

Anyway, this is a dress I made ages ago using a vintage pattern I found at Goodwill (see Knifty Does It and Working with Vintage). 

I love the high waist and the corset style lacing on the back, but the top isn’t as pretty as it could be.  Plus, being a dress, it can only be worn so many ways.  So why not turn it into a high-waisted skirt?  Being able to swap out the top would make it incredibly more versatile.

Transforming a vintage style dress to a high-waisted skirt.

First I carefully separated the top of the dress from the skirt.  I shortened the zipper too naturally.

Transforming a vintage style dress to a high-waisted skirt.

I had to replace the interfacing and facing on the waist.  I couldn’t find the original pattern I used for this part, so I had to use the skirt itself as a guide for cutting the pieces.  It’s not perfect, but since it’s on the inside where it won’t be seen it’s good enough for me.

Transforming a vintage style dress to a high-waisted skirt.

Then came the fun part, adding new lace.  I found this beautiful crocheted lace at SAS a while ago that I knew would be perfect for a skirt.  I used it along the top of the waistband and along the bottom hem. 

Transforming a vintage style dress to a high-waisted skirt.

And now it’s done!  I now have a beautiful and versatile high waisted skirt.

And what about the top of the dress?  I thought would make a cute little shrug. 

Turning the top of a dress to a cute shrug.

I first took it in a little.

Turning the top of a dress to a cute shrug.

I cut the opening in a curve shape to make it cuter and more flattering.

Turning the top of a dress to a cute shrug.

I thought the sleeves were too bulky, so I cut them at an angle to shorten them and used a zig-zag stitch along the edge of the fabric.

Turning the top of a dress to a cute shrug.

I did the same to all the cut edges.  I set the stitches to the smallest setting to make it looks nicer.  A serger would probably be great for this, but since I don’t own one (yet) this is okay.

Turning the top of a dress to a cute shrug.

After adding elastic to the sleeves, it looks almost cute enough to wear.  Almost.

Turning the top of a dress to a cute shrug.

Now after adding a lace ruffle, more lace trim, a snap and a bow, it is ready to wear. 

One pretty dress, morphed into a pretty skirt and a pretty shrug that can make even more outfits.  That’s a job well done. :)

Here’s the updated list:

  • Pink eyelet
  • Sunflower dress
  • Denim skirt
  • Velvet dress
  • Blue plaid
  • High-waist

Two down, four more to go.  The next one will definitely be done in a couple of days.  Look forward to it.

Read More »

Wednesday, July 15, 2015

Wordless Wednesday: Isn’t it Beautiful?

From the window display of an antique store downtown.

Vintage Viking Sewing Machine and Supplies

Read More »

Saturday, July 30, 2011

Knifty Does It and Working with Vintage

I got busy again the last couple days, with crafting.  Finished two more projects, the more complicated ones too.

Vintage style high-waisted dress

First off, I made this dress using a vintage pattern I got some time ago.  I didn’t quite follow the pattern exactly.  Basically I made the top part less poufy and the skirt more poufy.  Just the way I like it. 

Plus, the pattern called for using the same fabric for the top part and skirt and using a different fabric for the midriff part.  I thought doing it this way would be more interesting. 

Vintage style high-waisted dress

Here’s another difference.  The pattern called for decorative lacing on the front, I put the lacing on the back and it isn’t decorative.  This allows me to easily adjust the fit as needed since this dress needs a snug fit in the waist to look good.  Otherwise I look like I’m wearing a horrible cheap costume or something along those lines.

Pretty floral print purse

As a bonus, I made this simple matching bag to go with the dress.  The construction is similar to a double layered envelope, not sure how else to explain it. 

I had intended to add gussets to give it a flat bottom, but when I tried that it ended up looking like a very pretty lunch bag.  Not what I wanted, at least not with this bag.  Of course now I have a great idea for a lunch bag, but that’s for a future project.

Easy scarf made with a Knifty Knitter

Now the most trying project, a knitted scarf.  I never learned to knit when I was young and around here that is kind of a big deal.  Dealing with knitting needles kind of turns me off. 

So enter the Knifty Knitter loom, I bought it on sale at Joann Fabric and Crafts and committed myself to using it.  After fiddling with the included instructions which weren’t clear, I finally got started on my first knit project. 

The finished scarf isn’t too much to look at, but there’s nothing horribly wrong with it.  It was quick to make, totally painless, and I am actually willing to do another loom project.  The loom is fun to work with despite the instructions.  I found it easier to learn by paying more attention to the illustrations than the written steps and numbers.  Weird.

Here’s the updated list:

Ten down, just one more to go.  It will probably be finished by Monday.  I’m on a roll.

Read More »

Wednesday, June 22, 2011

Button Broach, a Tutorial

This post may contain affiliate links, please check out my disclosures page for more info.  Thanks!

Updated 6/17/17 with better Photos!

Awhile ago I found the cutest pack of buttons at SAS, I seem to be finding lots of cool stuff there lately.  Anyway, the buttons had a sort of vintage feel to them so I thought they would make pretty broaches.

Make pretty broaches with lace and cute buttons.

Here’s what you need:

  • Some interesting buttons, about 1 inch in size is preferable
  • Some pin-backs (like these) 
  • scissors
  • Wide pretty lace, I used two kinds of cotton eyelet lace.
  • A decent glue, I used Aleene’s Jewel-It.  It works miracles.
  • A threaded needle with a knot at the end, this is one of those things that is easier sewn by hand than machine.

Make pretty broaches with lace and cute buttons.

First cut about 7 inches of lace.  You are going to gather it to make a rosette, so if you already know how you can skip down a few steps.  If you don’t know what I’m talking about, keep reading.

Make pretty broaches with lace and cute buttons.

Sew the ends of your strip of lace together to form a tube shape.

Make pretty broaches with lace and cute buttons.

Now grab your needle and start sewing a running stitch along the bottom edge of the lace.  It doesn’t have to be neat.

Make pretty broaches with lace and cute buttons.

When you reach the end all you have to do is tug on the thread to gather the lace.  It will form a perfect little flower shape, perfect for embellishing a wide range of items. 

While you are dreaming of all the things you will use your lace rosettes for, don’t forget to knot the end of thread so it doesn’t un-gather.

Make pretty broaches with lace and cute buttons.

Now dab a good sized amount of glue to the front of the rosette.

Make pretty broaches with lace and cute buttons.

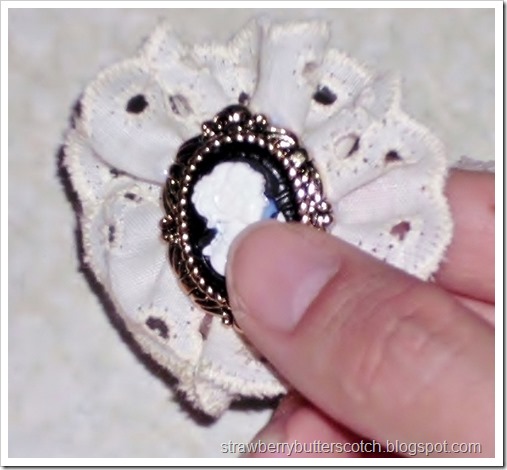
Carefully press your button into the glue.  The shank of the button should fit perfectly into the center of the rosette.

Make pretty broaches with lace and cute buttons.

Gently flip the rosette over and add some more glue.  This is to attach the pin-back and help secure the lace.

Make pretty broaches with lace and cute buttons.

Press your pin-back into the glue to finish the broach.

Another option here is to cut a circle from felt or some other fabric and glue it to the back before adding the pin-back.  This will allow for a neater look, at least neater than what’s shown here.

Another option is to avoid gluing all together by sewing it all.  Takes a little longer to make that way, but the results are beautiful. 

Make pretty broaches with lace and cute buttons.

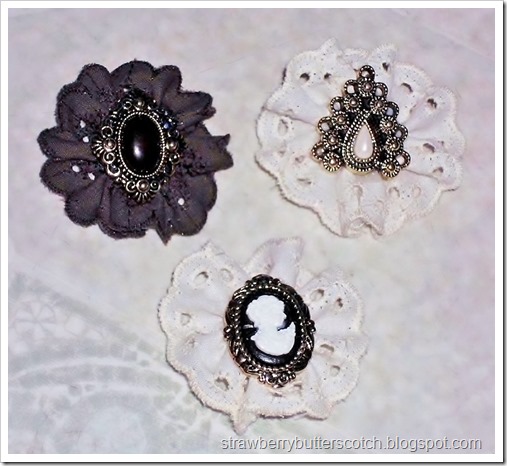
Here’s my finished results.  Hope yours looks just as lovely.  The cameo one at the bottom is the one in the other photos.  The other two I made using the “neater” option.  I will probably either sell those two or give them as gifts.

Here’s the updated list:

Five down, five to go.  The next project should be up by Saturday.

Update: I made a video tutorial for the lace rosette, feel free to check it out if you are having trouble making them.  Plus I made another tutorial for a similar broach, my lace applique broach.  Please check it out.

Read More »

Tuesday, July 21, 2009

Grown Up Dolls

One of my hobbies includes collecting dolls.  Not Barbies, although I do have a reproduction of a vintage bubble cut. 

Antique Bed Doll or Boudoir Doll

This is one of my favorites.  Her name is Violet and she’s a bed doll.  Apparently they were popular from about the 1920’s to 40’s, although I’m not an expert on this.  I got her on EBay with another that I gave to my mom. 

The price was a steal, but understandably so because they had no clothing at all except for Violet’s socks.  So I set to work trying to make an outfit that fit and hopefully was accurate to the style.

Grown Up Dolls

The little crocheted hat is adorable and a necessity because to my knowledge many manufacturers of these dolls only added enough hair as to peek out from the hat and left the rest of the head bald.  At least this is the case with most dolls wearing hats.  Again I’m not an expert on this topic. 

The little flower on the brim was just something I added because it needed a little something.  I had meant it to be temporary, but it’s actually been there for several years.  Oh well.  The matching scarf was just because I thought it was cute.  I actually made one for myself, although I don’t plan on wearing it anytime soon.  Darn Arizona summers.

Grown Up Dolls

The dress was made fairly quickly since I lacked patience, strange that years later it still technically isn't finished.  I still need to hem the sleeves and add some snaps and stuff.  At least she isn’t naked anymore, and her appearance has improve greatly since I cleaned her up and all.

If you’d like to learn more about dolls like her, there’s a fantastic book called Dolls of the Art Deco Era, 1910-1940 by Susanna Oroyan.  It has tons of info and it is really fun to read, plus it has patterns so you can try to make your own bed dolls.  I haven’t tried it yet, but someday maybe.  As soon as I finish Violet’s outfit, in like 20 years.

Read More »

Popular Posts