Search This Blog

Featured Post

Simple Flower and Lace Headband Tutorial

This post may contain affiliate links, please check out my disclosures page for more info.  Thanks! As promised yesterday, here is my headb...

Showing posts with label green. Show all posts

Tuesday, September 27, 2016

Blue and Ruffly, A Skirt Makeover

The last project on my list was a dress turned skirt, but the next one is skirt to skirt.

Turning a long blue skirt into an even cuter skirt.

I got this skirt ages ago at a thrift store.  It was long, ruffly and pretty, but not quite right for me.  The long waist section was a little unflattering as was the length.  It basically made me look short and hipless.  I thought it would look cuter on me if it was shorter.

Turning a long blue skirt into an even cuter skirt.

First I chopped off the waistband and added a new elastic one with white cotton.  Stretchy = Comfy.

Turning a long blue skirt into an even cuter skirt.

To make it extra pretty, I added white lace along the bottom ruffle.

Turning a long blue skirt into an even cuter skirt.

I made little ribbon bow too. :)

Turning a long blue skirt into an even cuter skirt.

The end result is a cute and fluffy ruffly skirt.

Here’s the updated list:

Three down, three more to go.  The next one should be up this weekend.  Look forward to it!

Read More »

Sunday, September 25, 2016

Vintage Floral – Pretty Dress to High-Waisted Skirt

After far too long, I finally finished another project on my craft list.  Not exactly the one I had plan to finish next either.  That one hit a few snags, but I will finish it eventually.

Transforming a vintage style dress to a high-waisted skirt.

Anyway, this is a dress I made ages ago using a vintage pattern I found at Goodwill (see Knifty Does It and Working with Vintage). 

I love the high waist and the corset style lacing on the back, but the top isn’t as pretty as it could be.  Plus, being a dress, it can only be worn so many ways.  So why not turn it into a high-waisted skirt?  Being able to swap out the top would make it incredibly more versatile.

Transforming a vintage style dress to a high-waisted skirt.

First I carefully separated the top of the dress from the skirt.  I shortened the zipper too naturally.

Transforming a vintage style dress to a high-waisted skirt.

I had to replace the interfacing and facing on the waist.  I couldn’t find the original pattern I used for this part, so I had to use the skirt itself as a guide for cutting the pieces.  It’s not perfect, but since it’s on the inside where it won’t be seen it’s good enough for me.

Transforming a vintage style dress to a high-waisted skirt.

Then came the fun part, adding new lace.  I found this beautiful crocheted lace at SAS a while ago that I knew would be perfect for a skirt.  I used it along the top of the waistband and along the bottom hem. 

Transforming a vintage style dress to a high-waisted skirt.

And now it’s done!  I now have a beautiful and versatile high waisted skirt.

And what about the top of the dress?  I thought would make a cute little shrug. 
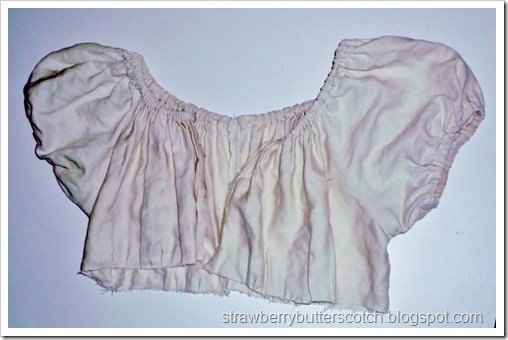
Turning the top of a dress to a cute shrug.

I first took it in a little.

Turning the top of a dress to a cute shrug.

I cut the opening in a curve shape to make it cuter and more flattering.

Turning the top of a dress to a cute shrug.

I thought the sleeves were too bulky, so I cut them at an angle to shorten them and used a zig-zag stitch along the edge of the fabric.

Turning the top of a dress to a cute shrug.

I did the same to all the cut edges.  I set the stitches to the smallest setting to make it looks nicer.  A serger would probably be great for this, but since I don’t own one (yet) this is okay.

Turning the top of a dress to a cute shrug.

After adding elastic to the sleeves, it looks almost cute enough to wear.  Almost.

Turning the top of a dress to a cute shrug.

Now after adding a lace ruffle, more lace trim, a snap and a bow, it is ready to wear. 

One pretty dress, morphed into a pretty skirt and a pretty shrug that can make even more outfits.  That’s a job well done. :)

Here’s the updated list:

  • Pink eyelet
  • Sunflower dress
  • Denim skirt
  • Velvet dress
  • Blue plaid
  • High-waist

Two down, four more to go.  The next one will definitely be done in a couple of days.  Look forward to it.

Read More »

Tuesday, June 26, 2012

Trimmings and An Angel

This post may contain affiliate links, please check out my disclosures page for more info.  Thanks!


Another thing that comes to mind when I think of Christmas is the tree.  So what better way to decorate the tree or the area around it than with itty bitty trees? 

Little tree ornaments made with craft foam, glitter glue and gold cord.  Super easy.I made these little ones with scraps of some craft foam I got at a thrift store.  I made them into little cones before gluing and stacking them on each other. 

The glue of choice for this one was hot glue from my trusty glue gun.  And I only burnt myself twice this time.  After that, I just decorated them with squeeze tube fabric paint and added gold braid for loops and decoration. 

Something similar could possibly be done by children as a fun project.  I say similar because I wouldn’t want them messing with a glue gun, plus the project wouldn’t be any fun for them if an adult had to do all the gluing.


Poor little thrift shop Bratz doll before her makeover.I got this old Bratz doll from a baggie of dolls from Goodwill.  It was the same baggie that my other Monster High doll came in (see Dressed Duo and Red Shoes), so she was sort of a bonus in the mix. 

As you can see, her hair was a horrible mess.  She also had no clothes which is normal for a thrift shop doll and had no shoes/feet which is normal for a used Bratz doll.  And to top it off, the poor thing had a broken wrist.  I thought of something very special to do with her. 

So here’s the the before…


A pretty Christmas Angel decoration made using a Bratz doll from a thrift store.  The wings are made from a plastic bottle.
…And after. 

She is now a Christmas angel, perfect for the tree or as a centerpiece.

First I cleaned her up and detangled all that hair.  I trimmed her hair and curled it too.  How do you curl doll hair?  You use either small strips of fabric or doll size curlers to roll the hair up.

Then the tricky part, boiling water.  You pour boiling water over the hair and set the doll down to cool and dry off.  It’s a technique I read in a doll book years ago, but I can’t remember which one.  I wouldn’t try it on a particularly valuable doll or brittle looking hair hair, but it’s fine dolls like this one with nothing left to lose.

The front sections of the hair are twisted to the sides and glued in place.  I used my trusty Aleene’s Jewel-It for this part.  The dress is just something I quickly whipped up with white fabric scraps.  I sewed it both on the machine and by hand and tied a ribbon around it.

To make the base, I cut up a PowerAde bottle.  I cut off the top half of the bottle and covered it with a pretty fabric scrap using a glue gun to secure it.  The doll’s legs and hips fit perfectly through the mouth of the bottle.

For the wings, I used a 2 litter soda bottle.  I cut off the top part of the bottle and removed the spout part.  I cut the piece in half and trimmed the two pieces to just the right shape.

These “wings” wouldn’t stop curling in too much at first, so I very carefully ironed them at a low heat.  I didn’t want them to melt all over my nice clean iron.  I glued the wings to a piece of fabric and glued them to the back of my angel.

All it took to finish is the halo, made from braided ribbon.  A bit of work, but she is one beautiful piece of recycling magic.

Here’s the updated list:

Nine down, just one more to go.  Yippee!


Give it a try:

Read More »

Wednesday, May 30, 2012

Foamy Flip-Flops


Here’s a fun little project, doll sandals made from foam food trays and felt.  I made a pair for a Ken doll, a Barbie doll, two Monster High dolls, and an American Girl doll (not pictured).  I just cut out pieces from the foam in the shape of the foot and then sewed on a strip of felt.  The felt is cut at an angle on the ends for a better fit.  The fun part was tracing the feet to get the right shape for the soles, although I did accidentally break one of the “soles” in half.  I found that gently squeezing the foam pieces made them more pliable and less likely to break.  Anyway, they are so much fun to make that I’m thinking of letting my niece make some too. 
Here’s the updated list:
  • Gift
  • Pencil case
  • T-shirt recon
  • Pink dress
  • Shorts
  • Patterns
  • Shoes
  • Striped skirt
  • Mazes
Nine down and out.   Right on schedule too. 
Read More »

Monday, April 30, 2012

Good Day for Crafting

Don’t you just love Mondays.  Well today I do, I finished the rest of my projects today.  I said I would didn’t I?  Just don’t ask how much progress I’ve made on my studies.

Barbie Doll Makeover Before

First up, this is a Barbie doll that used to belong to my niece.  She didn’t want it anymore and I seem to be a sucker for forlorn looking dolls.  Well, there’s nothing more fun than fixing them up right?  

So, here’s the before…

Old Barbie Doll to Flower Princess

…And after.  

She was easy to clean up except for that hair.  It took a ton of conditioner to smooth out that rat’s nest.  I decided not to give her a hair cut, though it was tempting.  

Looking at her long flowing hair, I envisioned flowers.  So I whipped up the wreath using tiny fake ones leftover from another project along with some wire.  Then I whipped up a dress that I thought would look good with the flowers.  I used the same fabric as I did for that doll dress in my last post, I did have tons of it leftover.  I made a strapless dress because it seems more light and airy, like spring.  

So now I have a “Spring Princess” doll.  You think my niece will want it back now?

Stretchy Gloves with Lace

Next, remember those simple $1 gloves I tweaked (see More Pretty Stuff)?  Well after about two winter seasons, they weren’t looking too good.  Trust me, they look way worse than in this photo.  I wanted to find a way to recycle them into something that is cute and could possibly be used in the spring weather too.

Finger-less Gloves with Lace

The solution?  These fingerless gloves, as modeled by my niece.  The fingers are the first things to wear out I any of my gloves, so why not just chop them off?  Beyond that, all it took was some lace and a lot of zig-zag stitching to transform them.  Now all I have to do is figure out what to do with them when their wear out again. 

Cute and Tiny Fleece Plushies with Googly Eyes

Last but not least, these tiny plushies.  I got the idea somewhere to make tinny-tiny little plushies.  I think from a book, but I don’t remember.  

Anyway, I used some of my stash of fleece scraps and some googly eyes to make them.  They are basically two pieces cut in simple shapes, zig-zag stitched around, then stuff and stitched shut.  Finish up by gluing on the eyes, then quickly make some more.  They are after all really fun to make. 

The larger ones are about 2 inches tall and the smaller baby ones are about an inch.  They kind of remind me of the those ghost things from Pac man.  Maybe that’s why they seem so adorable to me.  

Anyway, I still need to think of what else to do with them.  I was thinking of making some key chains with them, or maybe some pencil toppers.  Decisions, decisions.

Here’s the updated list:
  • Floral bag
  • Wreath
  • Doll
  • Top
  • Doll dress
  • Gloves
  • Black purse
  • Tiny plushies
  • Tiny “men” clothes
Nine down and out.  Now nothing to worry about but those pesky tests and school work.
Read More »

Friday, October 7, 2011

Just a Couple of Sweaters

I still haven’t finished drafting my new list, that should be up by tomorrow assuming I can finally decided on a few of the projects.  Anyway, this morning I decided to work on a few little things I had lying around.  Call them “mending” projects.

DSCI0623

This is a sweater thing I got for free from a thrift store downtown.  See why it was free?  The crocheted edge was ragged and had come undone in various spots and some of the buttons were missing.  It was mostly a job of removing the rest of edge and buttons in order to fix it.

DSCI0627 So after removing the “mess” shown here and adding some ribbon…

DSCI0629

…I got this.  Noticeably better.  The ribbon was threaded on a needle and “sewn” on with a running stitch.  I tied it in bows at the ends on the bottom and at the neckline to tie it close.  It’s cute, but sadly it looks very Spring.  Just when we were finally starting to experience Fall weather here.

DSCI0637

I guess that where this comes in.  I forgot to take a before photo but it was a pullover sweater made of the softest cashmere ever.  I got it from a friend as a hand-me-down, aren’t friends wonderful?  Anyway, pullovers aren’t quite my style so I opened it up.  I just cut down the front, then sewed some peach-colored ribbon along the edges before turning them under and sewing them down.  After that, all I did was sew a hook and eye to the top and glued two faux pearls.  This was to cover the stitches from the hook and eye which weren’t entirely hidden.  Plus it makes it prettier.  Now I have two similar sweaters for Fall and Spring, and they didn’t cost me a dime.Red heart

Read More »

Saturday, August 13, 2011

Pants to Potholders?

Remember that sewing class I took?  One of the projects required for all students was to make a pair of pajama pants.  They didn’t have to be good, they just had to be completed.  Well, a pair of the not-so-good ones was left behind by a previous student.  These ones were so badly done that I felt it would be too cruel to take a picture of them.  I took them home with me, no one else wanted them and I felt bad for them.  Plus the fabric used was super pretty.  But what to do with them?

DSCI0418

I made potholders with the pants.  Why potholders I have no idea, especially since I have never made them before this.  If you look carefully you can see some imperfections. (Hint: the bow on the heart shaped one isn’t just for show.)  For a first try they came out fairly well, and it’s fitting that they were recycled from another person’s first try. 

Here’s the updated list:

  • Business cards
  • Lip balm holders
  • Pins
  • Potholders
  • More doll clothes
  • Hook reuse
  • Pink skirt
  • Tote bag
  • Skirt
  • Bags

Four down, six to go.  The next project should be done by Monday.

Read More »

Monday, August 8, 2011

Taking Care of Business

DSCI0352These are my old business cards, from way back when I was still selling on etsy, or trying to anyway.  They aren’t exactly the cutest you’ve ever seen, plus since they have my old, old etsy url instead of my zibbet one they are useless like this.  I didn’t want to just toss them.  Good cardstock is a sad thing to waste.  So I reused them.

DSCI0359

With some tweaking, they became useful again.  I cut off the ends of the old cards leaving me with blank squares of cardstock.  I used my favorite strawberry stamp on all of them and wrote all my information on them with fine tip markers.  Finished up with decorative scissors, and I now have of set of handmade one-of-a-kind mini-business cards.  Of course I also have writer’s cramp too, the hazards of the personal touch.

Here’s the updated list:

  • Business cards
  • Lip balm holders
  • Pins
  • Potholders
  • More doll clothes
  • Hook reuse
  • Pink skirt
  • Tote bag
  • Skirt
  • Bags

One down, nine to go.  The next couple should be done by Wednesday.

Read More »

Wednesday, May 25, 2011

Cute Tee, ‘Nuff Said

Finished a couple of clothing recons.  First up is this t-shirt.

DSCI0007

It was a simple white t-shirt I got for 25 cents.  It fit me perfectly, but I like my tees to be more on the pretty side.

DSCI0010

Here’s the after shot.  Since this t-shirt already fit me well, I didn’t have to remove the sleeves to adjust it like I usually do.  I did cut the hems of the sleeves off at an angle before re-hemming them and adding lace and elastic.  I cut the the neckline in a slight square shape being sure not to cut it too low, did that one before.  I trimmed the neck with the same lace as the sleeves.  You probably can’t see the lace very well in this photo, but it will pop up again.  I recently brought it from SAS.  A humongous spool of pretty lace for only $1.  It will last for many years and hundreds of projects.  I think it works wonderfully for this t-shirt.  Now it’s a simple tee with a touch of cuteness. 

DSCI0013

Of course I need something to wear with my cute new t-shirt.  A simple full skirt works  well with it.  I made this skirt from a large pillow case I bought awhile ago at a rummage sale.  I had been planning on making a skirt with it for months but only now got around to it.  It’s a basic rectangle skirt with an elastic waistband and just a touch of lace at the hem.  I love the print on the fabric.  It’s tiny green flowers and from a distance they look kind of like moss.  I tried to make a matching headband, but it didn’t turn out quite right size-wise.  I’ll probably give it to my niece, she loves headbands and little girls can never have too many of them.

Here’s the updated list:

  • Slippers
  • Handkerchiefs
  • Cases
  • Pens
  • Binder
  • T-shirt
  • Skirt
  • Bag
  • Background

Eight down, just one more to go.  Open-mouthed smile

Read More »

Thursday, March 31, 2011

Red?

I’m not normally fond of red when it comes to my wardrobe.  Cranberry red, yes.  Ronald McDonald hair red, no.  But this Sunday, my church is having a very special event that involves everyone wearing red t-shirts to show unity.  So I have to oblige.

PICT0005 (5)I forgot to take a before photo of this shirt, but you aren’t missing much.  I got it for less than a quarter at a small thrift store and it was alright except for being too big for me and painfully plain.  Didn’t take much to fix that.  I removed the sleeves before taking it in and cutting off the neckline and bottom hem.  I re-hemmed the bottom and stitched lace on the neckline before turning it and stitching it.  After re-attaching the sleeves, I stitched some lace on them and elastic to gather them.  The final touch was some ribbon on the neckline to tie across my neck.  Now I have a pretty t-shirt that will still work for church.  It sometimes amazes me how versatile an old t-shirt can be.

Here’s the updated list:

  • Red shirt
  • Red skirt
  • Hair bows
  • Clock
  • Yellow shirt
  • Headband
  • Bag
  • Big bunny
  • Wristbands
  • Little bunnies
  • Easter dress

One down, ten to go.  The next one is just about done, but it may have hit a snag.  You’ll see what I mean later.

Read More »

Friday, March 25, 2011

Reduce, Reuse, Recycle

Spring is here, which always make me think of how important it is to live environmentally friendly, at least as much as we can.  One of the easiest and fun ways to do this is to reuse and recycle throwaway items into things we can really use and enjoy.  Here are a few tutorials I found that help with that.

  • Cardboard Cuff bracelets – These were a real surprise for me, jewelry made from corrugated cardboard.  Despite all my work with the stuff I had never thought to make accessories.
  • Newspaper Favors – Want to put together some cute party favors, but don’t want to shell out the cash for those decorative plastic bags?  Why not make these ones from old newspaper, save some cash and reduce your trash. 
  • Heart Pouches from Envelopes – These were intended for Valentine’s day, but the idea is brilliant for anytime you want to show someone you care.
  • Envelope Mini Album – Another use for envelopes.  Could make a cute gift to go with the heart pouches, or would that be too much?
  • Flowers from Paper Towel Rolls – I love finding unique ways of making flowers.  Nothing more unique than paper towel rolls, looks like it might work for toilet paper rolls too.
  • Storm Trooper Helmet from Milk Jugs – Here’s something fun for the kids, and for Star Wars fans of course.
Read More »

Saturday, January 29, 2011

Pretty in Pink

I said I would finish the list Saturday.  It may be a little later than I wanted, but it is definitely finished on this day.

100_3457

Remember this Bratz doll.  I got her at a rummage sale ages ago.  She was a bit dusty, hair badly tangled, and had no clothes at all as to be expected.  You almost never see old fashion dolls with clothes.  I took care of all that though.

PICT0005

Here’s the new and improved look.  Sorry about the photo quality, having camera issues again.  I cleaned her up and combed out her hair.  I put it in a pony tail and divided it up into smaller buns, it’s the only way I know how to make a pretty updo.  The curls by her ears were done by wrapping them around fabric strips then pouring boiling water on them.  The dress is made from cotton scraps from a dress I made along with scraps of lace.  I used the same lace for the necklace and cut little bits for earrings with straight pins to stick them in the ears.  That’s a trick I learned from my mom, she used to do that with her Barbie dolls when she was little.  Overall, the doll looks pretty good.  My niece says she looks like Cinderella.  In pink?  Maybe.

PICT0002 (2)

I forgot to take a before photo of this shirt.  It was found in the freebie bin of a small thrift store near us.  It was too long and a little boring except for the color.  I cut the bottom off a couple of inches and hemmed it, and cut the collar too.  It seemed too pointy and I have always wanted to try making cute curvy collars.  I then added some elastic to the sleeves and some lace on the collar and down the front.  I’m not sure if there’s much of an improvement to the shirt, but at least I was able to get some good practice out of it.  Not bad for a freebie.

PICT0017

I have a bunch of scraps of fleece that I’ve been trying to get used up and while thinking of uses I thought, “hearts? why not?”  So here’s a bunch of them.

PICT0015

Then I thought, “why not do something so I can share them?”  So I added pin backs and made these simple heart pins.  Perfect for Valentine’s Day.

Here’s the updated list:

  • Pretty up gloves
  • Ribbon headband
  • Doll makeover
  • Pearl headband
  • Hair bows
  • Pouches
  • Alter shirt
  • Yellow dress
  • Hearts

Nine down and out, and before the end of the month too.  Now I just have to finish packing.

Read More »

Monday, December 6, 2010

Pretty Pins and Pouches

Another couple of projects from the list.  First, I had a shirt that was plain and boring except for some lace along the hem.  With some cutting and this tutorial, I made these…

photos 1241

…Tissue pouches.  Super easy and they make a great gift, at least that was the idea.

photos 1247Next, another project using fleece scraps, pins.  I have made similar pins using felt before, but not quite as abstract looking.  I just cut shapes I thought were interesting, glued them together, then stitched around some of the edges.  Finish with a pin back, and I now have some colorful pins to give away.

Here’s the updated list:

  • Doll jacket
  • doll clothes
  • Tissue pouch
  • Pins
  • Scarf
  • Boxes
  • Purse
  • Ornaments
  • Wreath
  • Sweatshirt makeover
  • Mascot
  • Stickers
  • Robot
  • Collar
  • Red skirt
  • Tie
  • Christmas cracker
  • Dress

Four down, fourteen more to go.  Up next is something familiar.

Read More »

Wednesday, October 27, 2010

Done Already?

Sorry I haven’t been around the last few days.  But I have a lot to go over.  I made a trip to SAS, that’s this really great craft store around here that sells stuff really cheaply, I will show what I got tomorrow.  And I have some good things planned for this weekend,  I will talk about that tomorrow as well.  Plus, I finished the rest of my list too.  Not all the pictures are very good though, camera troubles again.

photos 1158

First up, headbands, with one of the worst photos ever.  My birthday is in a couple of days and of course I needed something for my twin sister.  A while ago, she made some stretchy headbands for her and her daughter, but they didn’t come out that well.  So I think these lacy ones will help, I even made a matching wristband.  Hope she actually likes them.  And no worries about spoiling the surprise, she doesn’t read my blog.

 photos 1162Next up, here’s my Halloween costume.  Anyone remember that green dress I made a while ago that didn’t come out quite perfectly (see Stick to the Pattern), well I did mention something about using it for a costume.  I took it in a little and shredded the hem.  The wreath for my hair is made from spiral notebook wire with strips of fabric and trimmings woven in it.  To finish it off, I made some odd arm accessories with strips of ripped fabric, some elastic and snaps.  If anyone asks, I’m a forest sprite, not Tinkerbelle.  The only problem with the costume is the weather.  Despite some assumptions about Arizona, it does get kind of chilly this time of year in the evening and I think my jacket would ruin this costume.  What to do?

photos 1153

Now this bag is an amazing work of recycling.  The fabric is from a pair of pants I didn’t like anymore, the clasp is from a vintage beaded purse that got chewed up by a dog I was sitting, and the lovely pearls along the clasps came from that same chewed up purse.  Now I have a nice new bag for practically nothing and it’s saving the planet too.  Yay.

blog photos

Last but not least, I had gotten this sweater vest for 25 cents years ago but just got bored with it although I still love it.  Doesn’t make any sense.  What to do with it?  Chop off the top and make a skirt.  Now I have a cute sweater mini-skirt, perfect for Fall weather, at least when paired with tights and cute boots.

Here’s the updated list:

  • Skirt
  • Lamp shade cover
  • Sewing machine cover
  • doll makeover
  • dress
  • scrunchies
  • head bands
  • costume
  • bag
  • vest recon

10 down and out.  Of course I will probably have the next list up by Friday seeing as I now have about 5 new projects that I need to start on immediately.  More on that later.

Read More »

Wednesday, August 25, 2010

Shoulder Pads Be Gone

I tackled another makeover of a thrift store shirt.   This time I actually managed to get a before photo.

photos 1015

I got this shirt for 25 cents at the thrift store up the street.  It was too big for me, had shoulder pads (shiver), a pocket I didn’t like and buttons and beads on it that I hated.

photos 1016

The redeeming quality is this lovely decorative stitching around the collar.  The back of the collar came to a cute point along with this thing, I think it’s suppose to be an embroidered star or flower.  Whatever, it is still cute.

photos 1031

Here’s the after shot, much better right?  I ripped off the buttons, beads, and pocket.  I think the beads will work better for jewelry, maybe rings.  I then removed the sleeves and chopped off a few inches on the hem, did I mention it was a little too long on me too?  I took it in on the sides and trimmed the arm area before reattaching the sleeves.  The final touch was to add some elastic to the sleeves, I have been really into puffed sleeves lately.  I also replaced the buttons of course, can’t go around with an open shirt, well I wouldn’t anyway.  Now it looks really cute on me.  What’s great is that I have a pretty vintage skirt I got from the same store that would look great with this shirt.  It’s the perfect look for Fall.

photos 1034

Since it wouldn’t do to waste fabric, I found a good use for that pocket.  I made it into this sweet little bow, I just haven’t figured out what to do with it.  I could attach it to a headband, or a hair elastic, or even wear it as a pin.  I even though of making it into a bowtie, now that would be odd.

Read More »

Popular Posts