Search This Blog

Featured Post

Simple Flower and Lace Headband Tutorial

This post may contain affiliate links, please check out my disclosures page for more info.  Thanks! As promised yesterday, here is my headb...

Showing posts with label umbrella. Show all posts

Friday, August 3, 2018

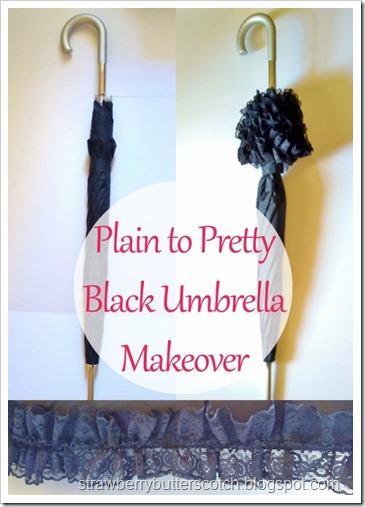
Plain to Pretty Black Umbrella Makeover

This post may contain affiliate links, please check out my disclosures page for more info.  Thanks!

The next project on my craft list is another makeover, this time for an umbrella.

I found myself having to replace my umbrella, again.  This time I decided to invest in one I was sure would last awhile before breaking on me. 


A simple black Totes stick umbrella with a curve handle, let's make it prettier.

I got this Totes stick umbrella, which was a little more than what I usually pay for umbrellas, but is totally worth it.

It opens and closes easily, dries quickly when wet, has held up to winds that have snapped previous umbrellas, and has one of the nicest and softest feeling handles I have ever touched.

I intentionally got it in black because it both makes it less likely to get really dirty and makes it better as a sun umbrella (check out this article about that).

Plain to Pretty Black Umbrella Makeover

The downside is that it isn’t as pretty as other umbrellas, but that is way too easy to fix.  We just need to add some…


Wide black lace, it will be used for our new umbrella.

…Lace!

I got this wide lace ages ago from SAS intending to use it for an umbrella.  It’s just like the lace I used for the white umbrella I decorated before (that got super dirty looking before breaking on me, sigh).


I like it specifically because it’s a pretty non-cottony lace.  I don’t recommend cotton laces because they are very absorbent.  When you use an umbrella for both sun and rain, adding something that absorbs a ton of water will make it take forever to dry.  Not to say that this lace won’t take a ton of time to dry too.


Ruffling the lace with a sewing machine.

I started by ruffling the lace using my sewing machine by using the longest stitch length and setting the tension higher.

The circumference of the umbrella is 124 in. (315 cm.) and I needed twice as much lace to make my lace ruffle plus a little extra for overlap.  The quicker option is to choose a lace that is already ruffled, but that narrows the selection quite a bit.


Pin the ruffled lace to the edge of the umbrella.

After ruffling, I pinned my lace along the edge of the umbrella.  Looking nicer already.


Carefully glue the lace down with a glue gun.

Now, I could have sewn the lace ruffle on by hand, but I was feeling lazy about it.  So, I glued it on with a glue gun.

First, I carefully glued down the sections of lace between the pins.


The lace is glued down, and all the stray bits removed.

Then I removed the pins one by one and glued down those areas.

I went around a couple more times to glue spots I missed and remove those annoying strings left by the glue gun (I watched a lot of videos while doing all of this).


Add tiny ribbon bows.

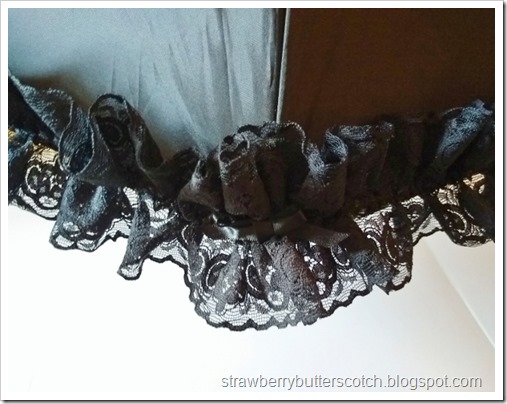
Finally, I made some little ribbon bows to add along the lace (check out my video tutorial for simple bows if you wish).


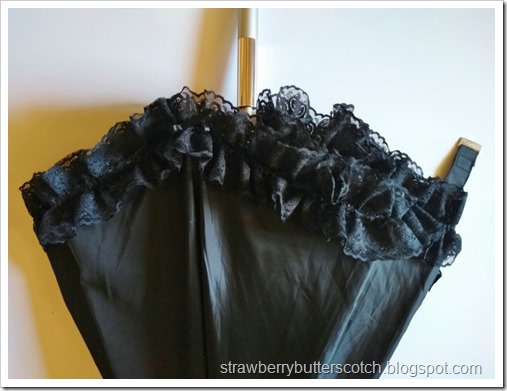
The finished and fully decorated umbrella.

And now the umbrella, or should I say, parasol is finished and ready for use.


Close up of the finished umbrella.

It is looks so pretty and the lace ruffle gives it a very poufy look, however…


The now lacy decorated umbrella can still be closed!

…It’s not too poufy to close up!  I was afraid I would have to change the strap.


Here’s the updated list:

  • 3 piece outfit
  • Holder
  • First aid cases
  • Umbrella
  • Tea set
  • Tote

Two down, four more to go.  The next one should be up tomorrow, look forward to it!


Give it a try:

Read More »

Friday, October 27, 2017

It’s Halloween! and a Costume!

This post may contain affiliate links, please check out my disclosures page for more info.  Thanks!

It took longer than anticipated to complete, but hopefully it was worth it.  My Halloween costume!

This year I was inspired to dress as a witch for Halloween due to a couple of strange occurrences.

Diy frilly witch costume with lace and roses. Halloween crafts.

After weeks of designing and sewing, here’s how it came out.  Sadly, I still haven’t figured out how to take pictures of dark clothing without it looking horribly.

Diy witch cape made from an umbrella. Halloween crafts.

Anyway, the idea to make a witch costume started with the cute caplet.  It’s made from an umbrella.

Umbrella to witch cape.

That’s right, my trusty black ruffled umbrella (bought here) suddenly died on me.  Being a little too attached to it, I saved the fabric hopefully to find something to do with it.

Then I remember an idea I heard about making ponchos with umbrellas and that lead to thinking about capes.


Umbrella to diy witch cape.

After cutting the fabric open and trimming it with lace and ribbon…

Umbrella to diy witch cape. Halloween crafts.

…I just had to tie it in front for an nearly instant witch’s cape.

If you look carefully, you can see that the lace is the same black lace from my recent craft haul (see A Spooky Black Craft Haul).

Altering a vest for a witch costume. Halloween crafts.

Moving on, this vest and striped blouse actually came from a lucky pack (sort of like a grab bag) I bought from Bodyline recently (I forgot to mention it).

I’m afraid the pack was a bit more unlucky for me because many of the pieces in it were horrible.  These two had promise and I realized quickly that they were perfect for this outfit, with some work.  The blouse was okay to begin with, but the vest so was not.


Altering a vest for a witch costume. Halloween crafts.

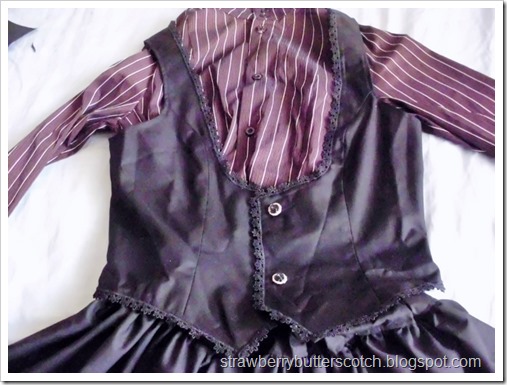
This is what the vest looked like before I started on it.  I think they were going for an “edgy” asymmetrical look.


Altering a vest for a witch costume. Halloween crafts.

Anyway, after removing the odd ruffle from the neckline…

Altering a vest for a witch costume. Halloween crafts.…and the odd “ruffle” from the hem…

Altering a vest for a witch costume. Halloween crafts.…then sewing on more of the that black lace (By Hand!), it was perfect.  Without the odd ruffles it’s easier to notice the cute rose buttons.

The vest actually came with an odd pair of matching shorts with the same buttons.  I may need to swipe them for another project.  :)

Skirt for diy witch costume. Halloween crafts.Now for the skirt, made with the black fabric from my craft haul.  It’s a simple full rectangle skirt with a ruffle and an elastic waistband.  Here’s a decent tutorial to make a similar skirt if you like.


diy ruffled skirt.

I added the same lace along the top of the ruffle.  It really helps bring the whole outfit together.

I keep on saying outfit instead of costume since most of the pieces actually will work with my wardrobe, especially this skirt.  Pair it with a white blouse (like this one I altered) and pretty head band (like this one I made), and I’m good to go.


Diy frilly witch costume with lace and roses. Halloween crafts.

However, we’re still thinking about Halloween here, so here’s the piece that really makes it a costume.  The witches hat.

I bought this plain hat from Target to decorate with ribbon and roses.  It’s actually the children’s hat because the “one size fits most” adult size hat was too big for me.  It works out well because the children’s one is a dollar less. (Here's a similar one from Michael's.)


Diy frilly witch costume with lace and roses. Halloween crafts.

To decorate, I mostly just twisted and wrapped some wide ribbon around the brim and added a large but simple bow.

What really finishes it off is the rose piece in the center.  To make it, I twisted two roses together by their stems and covered the stems with ribbon before attaching to the hat.


Diy frilly witch costume with lace and roses. Halloween crafts.

The neat thing is that I used a pin back to make the rose piece removable.  So after the holiday I can wear this as a large brooch if I want.

Black hair bows for Halloween.  Halloween crafts.

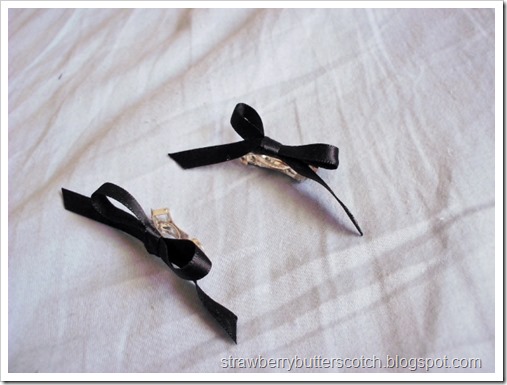
While I had the glue gun out for the hat and “brooch”, I also made these quick and easy hair clips with leftover black ribbon.  I thought some hair bows would be just the thing to make this witch outfit cuter.

And with that I’m ready for Halloween, at least costume-wise.  Don’t ask about the candy.

Here’s the updated list:

  • Baby
  • Blue dress
  • Tiny outfits
  • T-shirts
  • Halloween
  • Pink dress
  • More T-shirts

Two down, five more to go.


Give it a try:

Read More »

Sunday, June 28, 2015

Catching Up – A Wee Bit of Online Shopping

This post may contain affiliate links, check my disclosures page for more info.  Thanks!

As a former tax preparer, I have a tendency to get my taxes done fairly early compared to most people.  Mainly because when working as a preparer, if you don’t get them done early you may have trouble finding the time to do them yourself and on time.  Plus what self-respecting tax preparer would even think of letting someone else do their taxes for them.  All this means is I filed my taxes and received my modest but decent sized tax refund in a timely matter. 

Now what did I do with my refund?  I invested some of it by buying bonds, and put some of it toward paying off debt, and some of it went to savings.  The rest went towards some items on my wish list.  Just a few things I have been eyeing for a while and thought would be useful to have for Spring as well as the rest of the year.

First off, you may have notice in the picture at Phoenix Comicon (see Catching Up - Conventions Anyone?) I’m carrying a white parasol.  I sort of made it myself, specifically for the con and for Spring.

Triangle Shipping Box

It start out as a white umbrella from World Import Co. on eBay.  It costs $16.99 with free shipping.  It came in just a few days in this cool triangle box.  I wanted to keep it but I somehow couldn’t think of a good use for it.  Such a shame.

White Umbrella

Anyway, here’s the umbrella along side some bubble wrap, yay bubble wrap!  This umbrella is the “parasol” style, so it has a ruffle on the bottom.

Umbrella Handle

I mainly bought it for the white color and this handy hook shaped handle.  They come in other colors that were tempting, but I just stuck with the white.  Still, it would be interesting to have a pink umbrella.  The thing is that the handle is a tad thicker than I was expecting.  Thicker does mean less likely to break which is good, but it also means slightly harder to hold.  At least it does with my small hands.  It’s just something I have to get use to.

Umbrella End

I do like the pointed end though, it’s one of the things I look for when buying umbrellas.  It just looks really nice and gives the umbrella a certain vintage touch.

Ruffle Close Up

The ruffle is pretty okay, it adds a sweet touch and saves me time since I was planning on adding a ruffle anyway.

Umbrella Close Up

The thing that really concerned me was the sheerness of the material.  I wanted to use this umbrella for both rain and shine.  If it’s too sheer will it offer enough sun protection?

Applying Lace to Umbrella

That problem was easy to fix.  I had originally planned to add just a little lace trim, but instead I completely covered it with row upon row of pretty and water resistant lace.  It took quite a bit of time, but it was so worth it.

Finished Parasol

Here’s the results.  I forgot to take a picture immediately after finishing, this one was taken after using it for several weeks.  The problem with white is that it is so easy to get it dirty.  Oh well, at least it’s pretty.

Package from Rose Boutique

I also bought a new petticoat, my other was dying on me.  It actually fell flat on me almost immediately after this one arrived, maybe out of jealousy?  I found the new one on Amazon, sold by Rose Boutique for $25 including the shipping cost.  They shipped it out quickly.  It was estimated to arrive in about 10 days, but it came early so when I got it I didn’t know what it was.  It came in this really tiny package. 

Wrapped Petticoat

I still didn’t know what it was when I opened the package until I read the included washing instructions.  I thought that was helpful at least.

New A-line Petticoat

Behold the unwrapped poufy petticoat.  It expanded like crazy after I unwrapped it.  It’s a 50’s style petticoat, so it has a bit of an a-line shape to it.  A little too a-line sadly for my use, but I was able to easily alter it to give it a softer and rounder shape.  Now it’s perfect and it cost a fraction of what similar shaped ones would have cost me to buy/make.

Package from Bodyline

I also bought a couple of blouses I’ve been eyeing from Bodyline. The total came to 5,998 Japanese Yen with free shipping, which comes to about $25 each.  Considerably more than what I usually pay for clothing, but they were worth it.

Bodyline Bags

They came wrapped in these cute red bags.  I saved them because they were so cute, I think they would be useful for organizing accessories or even paperwork.

Bodyline l076 Blouse

The first one is this short sleeved blouse.  It has beading lace on the collar and down the front, rose shaped lace down the front too, and faux pearl buttons.  It also has lacing on the back to give it a fitted look which is nice.  I found the wide crochet lace on the collar and sleeves a bit awkward the first time I wore it, but now I love them.  I bought it in a size medium and it fits okay except its slightly too big at the shoulders.  I’ll take it in eventually, but for now it’s okay.

Bodyline L108 Blouse

I also got this long sleeved blouse. It has some of the same types of lace as the short sleeved blouse which is so great, but there are a few problems.  It has the same fitting issue as the short sleeved blouse, the lacing on the back isn’t quite as nice looking, and then there’s the buttons.

Bodyline blouse upclose

First one of them actually snapped off when I simply tried on the blouse, possibly the result of damage during shipping.  It did come with one spare button, just one though.  The first time I wore the blouse a second button snapped off.  Luckily the buttons were definitely not my favorite part, now it will be easier to just switch them out for nicer buttons.  Otherwise I still really like both blouses.

There actually is one other thing I purchased over the last few months, but I’m saving that for another post because it involves a special surprise.  Look forward to it. :)
Read More »

Popular Posts